
Building an app without a prototype is like constructing a house without blueprints. Expensive mistakes become inevitable.
Understanding what an app prototype is separates teams that ship successful products from those that burn through budgets fixing preventable problems.
A prototype lets you test ideas, gather user feedback, and validate design decisions before writing any code.
This guide covers prototype types, fidelity levels, creation stages, and the tools UX designers and product teams rely on daily.
By the end, you will know exactly when to build a prototype, which format fits your project, and how to avoid the pitfalls that derail app development.
What is an App Prototype?
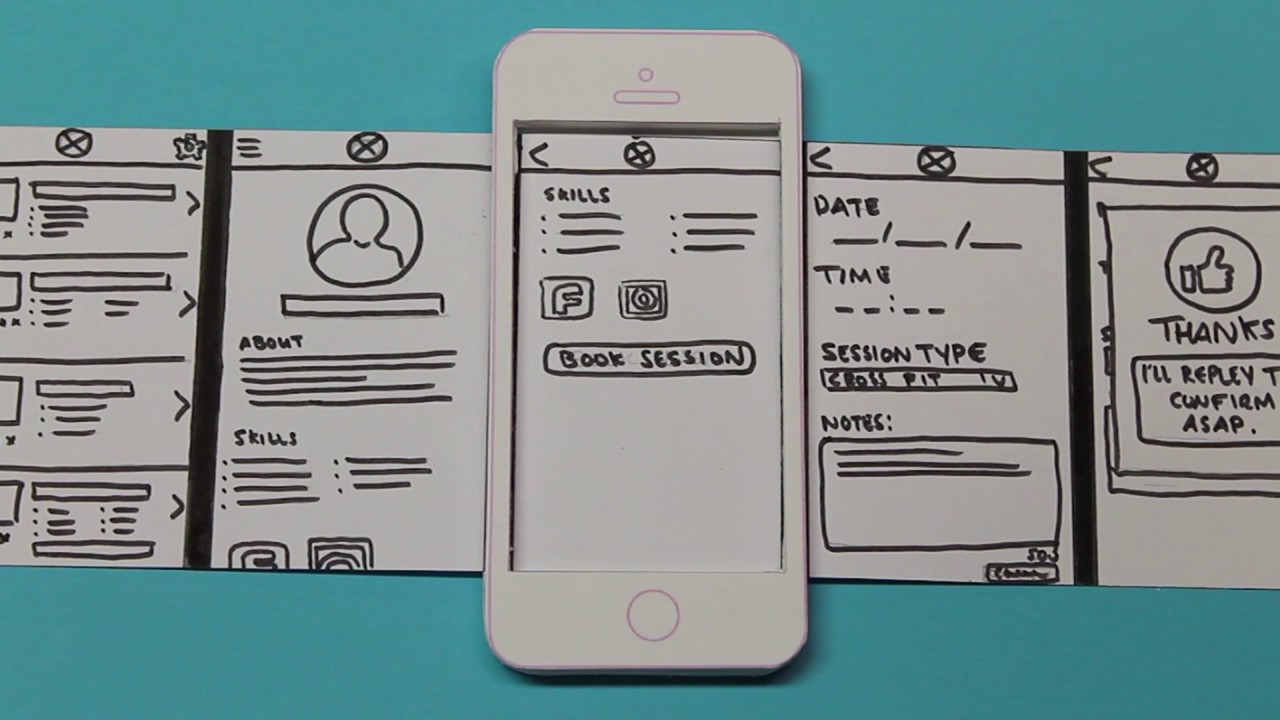
An app prototype is a preliminary interactive model of a mobile or web application that demonstrates basic layout, design, and functionality before full-scale development begins.
It ranges from simple paper sketches to high-fidelity clickable simulations.
Product teams use prototypes to test ideas, collect user feedback, and validate design decisions without writing a single line of code.
The prototype sits between initial concept and actual software development, serving as a communication bridge between designers, developers, and stakeholders.
Think of it as a draft version of your app. Functional enough to click through. Realistic enough to gather honest feedback.
How Does an App Prototype Work
A prototype simulates how users navigate through an application by linking screens together with clickable elements and transition effects.
UX designers create individual screens, then connect buttons, menus, and links to demonstrate the complete user flow.
When someone clicks a button in the prototype, they see exactly what would happen in the real app. The navigation menu opens. The form submits. The next screen appears.
This simulation enables usability testing before any actual coding begins. Teams observe real users interacting with the prototype and identify friction points, confusing navigation patterns, or missing features.
Feedback gets documented, designs get refined, and the cycle repeats until the experience feels right.
Types of App Prototypes
Prototypes fall into three categories based on their fidelity level, which refers to how closely they resemble the final product.
Low-Fidelity Prototypes
Paper sketches and basic wireframes drawn in monochrome with placeholder content. Fast to create, easy to discard, perfect for early brainstorming sessions.
Mid-Fidelity Prototypes

Digital wireframes with gray-scale design and basic interactions. More structured than paper but still focused on layout and content hierarchy rather than visual polish.
High-Fidelity Prototypes

Realistic designs with brand elements, full interactivity, and detailed visual components. These look and feel like the actual app, making them ideal for user testing and stakeholder presentations.
Components of an App Prototype
Every app prototype contains several core elements that work together to simulate the user experience:
- User interface elements – buttons, input fields, icons, images, and text blocks
- Navigation structure – menus, tabs, back buttons, and breadcrumbs that guide users through screens
- Content placeholders – dummy text and sample images representing final content
- Interactive hotspots – clickable areas that trigger screen transitions or state changes
- Screen transitions – animations and effects showing how screens connect
The complexity of these components depends on the prototype’s fidelity.
Low-fidelity versions use simple boxes and labels. High-fidelity prototypes include actual fonts, colors, and pixel-perfect spacing that matches the intended UI/UX design.
Differences Between Wireframe, Mockup, and Prototype
| Aspect | Wireframe | Mockup | Prototype |
|---|---|---|---|
| Definition | A low-fidelity skeletal framework that displays the basic structure, layout, and content placement of a digital interface without visual design elements. | A high-fidelity static visual representation that includes detailed design elements, colors, typography, images, and branding to showcase the final appearance. | An interactive simulation of the final product that demonstrates functionality, user flows, transitions, and behaviors through clickable elements. |
| Primary Purpose | Establishes information architecture, defines content hierarchy, and validates structural decisions before investing in visual design. | Communicates visual design direction, obtains stakeholder approval on aesthetics, and serves as a reference for developers. | Tests user interactions, validates navigation patterns, identifies usability issues, and gathers feedback on user experience flows. |
| Fidelity Level | Low fidelity (10-20% of final product). Uses grayscale, placeholder text, simple shapes, and basic boxes to represent interface components. | High fidelity (80-95% of final product). Includes pixel-perfect designs, actual content, branded colors, custom icons, and production-ready visuals. | Medium to high fidelity (60-90% of final product). Ranges from basic clickable wireframes to fully designed interactive experiences with animations. |
| Interactivity | Static and non-interactive. Viewers observe the layout structure without engaging with functional elements or navigation. | Static and non-interactive. Presents visual design as fixed images or screens without clickable functionality or state changes. | Fully interactive and dynamic. Users click buttons, navigate between screens, fill forms, trigger animations, and experience realistic workflows. |
| Creation Time | Fastest to produce (1-4 hours for a simple page, 1-2 days for complex applications). Requires minimal design skills and tools. | Moderate time investment (4-8 hours per screen, 3-7 days for full project). Demands advanced design expertise and attention to detail. | Most time-intensive (8-16 hours for basic version, 1-3 weeks for high-fidelity). Requires interaction design knowledge and technical implementation. |
| Common Tools | Balsamiq, Sketch, Figma (wireframe mode), Adobe XD, Whimsical, pen and paper, whiteboard sketches. | Figma, Sketch, Adobe XD, Adobe Photoshop, Adobe Illustrator, InVision Studio, Affinity Designer. | Figma (with prototyping), Adobe XD, InVision, Axure RP, Principle, ProtoPie, Framer, Marvel App. |
| Stakeholder Focus | Content strategists, information architects, product managers, and UX designers who validate structure and content organization. | Clients, executives, marketing teams, and brand managers who evaluate visual identity, aesthetics, and alignment with brand guidelines. | End users, usability testers, developers, and UX researchers who assess interaction patterns, task completion, and user experience quality. |
| Level of Detail | Minimal detail with placeholder content (“Lorem ipsum”), generic icons, and simplified representations. Focuses on spatial relationships. | Maximum visual detail with final copy, high-resolution images, precise spacing (measured in pixels), exact color codes (HEX/RGB), and custom graphics. | Functional detail with working interactions, state changes (hover, active, disabled), form validation, error messages, and realistic data flows. |
| Cost Factor | Lowest cost ($50-$200 per page for freelance work). Inexpensive to iterate and modify based on feedback. | Moderate cost ($200-$800 per screen for freelance work). Revisions require skilled designers and consume more billable hours. | Highest cost ($500-$2,000+ for complex flows). Technical complexity and interaction logic increase development time significantly. |
| Design Phase | Early conceptual phase. Created during initial planning, requirement gathering, and information architecture development (Week 1-2 of project). | Mid-stage visual design phase. Developed after wireframe approval and before development handoff (Week 3-5 of project). | Late validation phase. Built after mockup approval to test usability before final development begins (Week 5-7 of project). |
These three terms get confused constantly. They represent different stages in the design process.
Wireframes are structural blueprints. Black and white layouts showing where elements go on each screen. No colors, no images, no interactivity. Pure structure.
Product managers and UX designers use wireframing tools to sketch these quickly during early planning.
Mockups add visual design to wireframes. Colors, typography, images, and branding appear. Still static, but now stakeholders can see what the app will actually look like.
Prototypes add interactivity to mockups. Click a button, something happens. Scroll down, more content loads. The experience becomes tangible.
Here’s the progression:
- Wireframe – structure and layout (low fidelity)
- Mockup – visual design added (medium to high fidelity)
- Prototype – interactivity added (testable experience)
Teams building mobile applications typically move through all three stages, though the boundaries often blur depending on project needs and available prototyping tools.
Benefits of Creating an App Prototype
Prototyping catches problems early when fixes cost almost nothing. Finding a navigation flaw in a clickable mockup takes minutes to correct. Finding the same flaw after coding takes days.
Key benefits include:
- Cost reduction – design changes before development are 10x cheaper than changes after
- Early issue detection – usability problems surface during testing, not after launch
- Stakeholder alignment – everyone sees the same vision instead of imagining different products
- User feedback collection – real users reveal blind spots designers miss
- Investor presentations – a clickable prototype beats a slide deck every time
Many failed startups skipped prototyping and built products nobody wanted. A two-week prototype could have saved months of wasted development.
Stages of App Prototype Development
The prototype development process follows a predictable path from rough concept to polished interactive model.
Stage 1: Requirement Gathering
Define what problem the app solves, who uses it, and what core features matter most. Skip this and everything downstream fails.
Stage 2: Sketching
Rough paper sketches or whiteboard drawings capturing initial screen layouts. Speed matters more than polish here.
Stage 3: Digital Conversion
Transfer sketches into a design tool. Basic wireframes take shape with proper proportions and element placement.
Stage 4: Visual Design
Add colors, typography, icons, and images. The prototype starts looking like a real app.
Stage 5: Interaction Design
Link screens together, add transitions, and create clickable hotspots. The static mockup becomes interactive.
Stage 6: Testing and Refinement
Put the prototype in front of users, observe their behavior, document friction points, and iterate until the experience feels intuitive.
How to Create an App Prototype
Start with the problem your app solves. Write it down in one sentence. If you cannot, your concept needs more work.
Next, list the core features. Not everything the app could do. Just the 3-5 things that deliver primary value.
Map the user flow from first screen to task completion. Sketch each screen users encounter along the way.
Choose a prototype tool based on your fidelity needs and team skills. Figma works well for most teams. Balsamiq suits rapid low-fidelity work.
Build screens in your chosen tool, then connect them with interactions. Test the flow yourself first, then with teammates, then with actual target users.
Document all feedback and prioritize changes based on frequency and severity. Refine and test again.
This iterative approach continues until the prototype validates your design decisions and aligns with the broader software development process.
Tools for App Prototyping
| Tool Category | Tools | Primary Use Case | Key Characteristics |
|---|---|---|---|
| Low-Fidelity Wireframing | Balsamiq Whimsical | Rapid concept visualization and early-stage layout planning for ideation sessions | Sketch-style interfaces, minimal visual polish, fast iteration speed, focus on structure over aesthetics |
| High-Fidelity Design | Figma Sketch Adobe XD | Production-ready interface design with precise visual specifications for development handoff | Pixel-perfect accuracy, comprehensive design systems, detailed component libraries, collaborative design workflows |
| Advanced Interaction Prototyping | Framer Principle ProtoPie | Complex animation sequences and interactive behavior simulation for user testing validation | Code-based animations, physics-based interactions, advanced micro-interactions, timeline controls |
The right prototype tool depends on fidelity requirements, team size, and budget.
For low-fidelity work:
- Balsamiq – intentionally rough wireframes that keep focus on structure
- Whimsical – fast flowcharts and basic wireframes with minimal learning curve
For high-fidelity prototypes:
- Figma – browser-based, collaborative, free tier available, industry standard
- Sketch – Mac-only, mature plugin ecosystem, popular with design agencies
- Adobe XD – tight integration with other Adobe tools, voice prototyping support
For advanced interactions:
- Framer – code-level control over animations and interactions
- Principle – timeline-based animation for complex transitions
- ProtoPie – sensor-based interactions for iOS and Android prototypes
Most teams start with Figma. It handles everything from basic wireframes and prototypes to production-ready designs without switching tools.
When to Use an App Prototype
Not every project needs a prototype. Simple CRUD apps with standard patterns might skip straight to development.
Build a prototype when:
- The user flow involves complex navigation or multi-step processes
- Stakeholders struggle to visualize the concept from descriptions alone
- You need to validate assumptions before committing development resources
- Investor pitches require something tangible to demonstrate
- The development budget is tight and mistakes must be minimized
Skip the prototype when:
- Building a simple landing page or basic form
- The interface follows established patterns with zero innovation
- Time pressure demands immediate development
For custom applications with unique workflows, prototyping almost always pays off.
Best Practices for App Prototyping
Match fidelity to your current stage. Paper sketches during brainstorming. High-fidelity prototypes before development handoff. Anything else wastes time.
Involve users early and often. Internal feedback matters, but nothing replaces watching actual target users interact with your prototype.
Keep scope tight. Prototype the core flow, not every edge case. You need validation on the main journey before worrying about password reset screens.
Document everything. Every usability session should produce written notes, not just memories. Patterns emerge when you review feedback across multiple sessions.
Set clear success criteria before testing. Define what “good enough” looks like so iteration does not become endless.
Communicate that prototypes are not final products. Stakeholders sometimes confuse a polished prototype with a finished app, leading to unrealistic timeline expectations.
FAQ on App Prototypes
What is the main purpose of an app prototype?
An app prototype validates design decisions and tests user flows before development begins. It allows teams to gather feedback, identify usability issues, and align stakeholders on the product vision without writing code.
How long does it take to create an app prototype?
Low-fidelity prototypes take hours to days. High-fidelity interactive prototypes require one to three weeks depending on complexity. Rapid development approaches can accelerate this timeline significantly.
What is the difference between low-fidelity and high-fidelity prototypes?
Low-fidelity prototypes use basic wireframes and placeholder content for quick concept testing. High-fidelity prototypes include realistic visuals, brand elements, and full interactivity that closely resembles the final product.
Can I create an app prototype without design skills?
Yes. Tools like Balsamiq and Whimsical require minimal design experience. Paper sketches work for early brainstorming. Product managers and founders regularly create functional prototypes without formal UX training.
What tools do professional designers use for app prototyping?
Figma dominates the industry for collaborative design and prototyping. Sketch remains popular among Mac users. Adobe XD, Framer, and InVision handle advanced interaction design and complex animations.
How much does app prototyping cost?
DIY prototypes using free Figma tiers cost nothing. Professional prototype design from agencies ranges from $2,000 to $15,000 depending on fidelity level, screen count, and interaction complexity.
Should I prototype before or after writing requirements?
Prototype after defining core requirements but before detailed specifications. Requirements tell you what to build. Prototypes help you figure out how it should work and feel.
Can prototypes be used for investor presentations?
Absolutely. A clickable prototype demonstrates your vision far better than slides or verbal explanations. Investors see the actual user experience, which builds confidence and makes funding decisions easier.
What happens to the prototype after development starts?
Prototypes serve as reference documents for developers during the build phase. They guide front-end implementation and ensure the coded product matches approved designs. Most teams archive prototypes for future iterations.
Is prototyping necessary for simple apps?
Not always. Standard apps following common patterns might skip prototyping. Complex user flows, innovative interfaces, or hybrid applications with unique interactions benefit significantly from prototype validation.
Conclusion
Understanding what an app prototype is gives you a significant advantage in product development. It transforms abstract ideas into testable experiences.
The investment in prototype testing pays off through reduced development costs, faster iteration cycles, and better stakeholder alignment.
Start with low-fidelity sketches during early ideation. Progress to clickable prototypes before any development handoff.
Tools like Figma and Sketch make the process accessible to anyone willing to learn. No coding required.
Whether you are building for a startup pitch or refining a complex software system, prototyping reduces risk and clarifies vision.
Skip this step and you gamble with your budget. Embrace it and you build products users actually want.


