Every software development project starts somewhere. Usually, it starts with learning how to clone a GitHub repository.
Cloning creates a local copy of any project hosted on GitHub. All files, branches, and commit history download straight to your machine.
Without this skill, you cannot contribute to open-source projects, collaborate with teams, or work on existing codebases offline.
This guide covers four cloning methods: HTTPS, SSH, GitHub CLI, and GitHub Desktop.
You will learn exact commands, step-by-step instructions, and fixes for common errors. Takes about 5 minutes to complete your first clone.
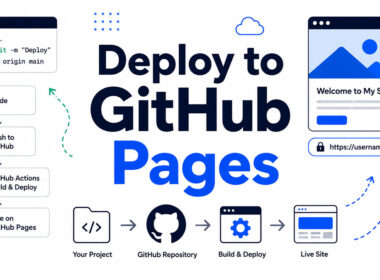
How to Clone a GitHub Repository

Cloning a GitHub repository is the process of copying all files, commit history, and branches from a remote repository to your local machine.
Developers need this when contributing to open-source projects, starting work on team codebases, or creating local backups of important code.
This guide covers 4 cloning methods requiring 2-5 minutes and basic command line knowledge.
Prerequisites
Before you run the git clone command, make sure you have these tools ready.
Required Software
- Git version 2.0 or higher installed on your system
- A GitHub account (free or paid)
- Terminal access: Git Bash on Windows, Terminal on macOS or Linux
Optional Tools
- GitHub Desktop application for GUI-based cloning
- GitHub CLI (gh) for command line workflows
- Visual Studio Code with Git extension
For SSH Cloning
You’ll need an SSH key configured and added to your GitHub account.
Skip this if you’re using HTTPS.
Time and Skill Level
Time estimate: 2-5 minutes depending on repository size.
Skill level: Beginner-friendly.
Step One: How Do You Find the Repository URL on GitHub?
The repository URL is located on the main page of any GitHub project under the green Code button, which displays HTTPS, SSH, and GitHub CLI options in a dropdown menu.
Action
- Navigate to
github.comand open the repository you want to clone - Click the green Code button above the file list
- Select your preferred URL type: HTTPS, SSH, or GitHub CLI
Expected Result
A dropdown appears showing the clone URL with a copy icon next to it.
Click the icon to copy the URL to your clipboard.
Purpose
The URL tells Git where to download the source code from.
Wrong URL format means authentication failures.
Step Two: Which Cloning Method Should You Choose?
GitHub offers four ways to create a local copy of a repository: HTTPS for simplicity, SSH for security, GitHub CLI for speed, and GitHub Desktop for visual workflows.
HTTPS Method
Best for beginners and quick one-time clones.
Works immediately without setup; prompts for username and personal access token on private repos.
URL Format
https://github.com/username/repository-name.git
SSH Method
Best for frequent contributors who want password-less authentication.
Requires one-time SSH key setup but saves time on repeated pushes and pulls.
URL Format
git@github.com:username/repository-name.git
GitHub CLI Method
Best for developers already using gh commands in their workflow.
Shorter syntax; handles authentication automatically after initial login.
Command Format
gh repo clone username/repository-name
GitHub Desktop Method
Best for visual learners and those uncomfortable with terminal commands.
Point-and-click interface; shows clone progress graphically.
Quick Comparison
| Method | Setup Time | Auth Type | Best For | Key Advantage |
| HTTPS (OAuth) | < 1 min | Token/Browser | Beginners & Public Repos | No manual key management; works behind all firewalls. |
| SSH | 5–10 min | RSA/Ed25519 Key | Daily Contributors | No re-authentication needed; “set it and forget it.” |
| GitHub CLI | 2–3 min | Native App | Power Users & Scripting | Manage PRs, Issues, and Repos without leaving the terminal. |
| GitHub Desktop | 5 min | OAuth | GUI Preference | Visualizing complex branching and merge conflicts. |
Step Three: How Do You Copy the Repository URL?
Click the copy icon next to the displayed URL in the Code dropdown to save the repository URL to your clipboard for use in the terminal.
Action
- Click the HTTPS, SSH, or GitHub CLI tab
- Click the clipboard icon to copy the URL
- Verify the URL appears in your clipboard
Purpose
The exact URL format determines your authentication method.
HTTPS URLs start with https://; SSH URLs start with git@.
Step Four: How Do You Navigate to Your Target Directory?
Use the cd command in your terminal to move to the folder where you want the cloned codebase to live on your local machine.
Action
- Open Terminal, Git Bash, or Command Prompt
- Type
cd /path/to/your/directoryand press Enter - Confirm location with
pwd(Mac/Linux) orcd(Windows)
Common Directory Paths
- Windows:
cd C:UsersYourNameProjects - macOS:
cd ~/Documents/Projects - Linux:
cd ~/projects
Purpose
Git creates a new folder inside your current working directory.
Choose a location you can easily find later.
Step Five: How Do You Execute the Git Clone Command?
Type git clone followed by the copied URL, press Enter, and wait for the download to complete with all files, branches, and commit history intact.
HTTPS Clone Command
“ git clone https://github.com/username/repository-name.git `
Prompts for credentials on private repos.
SSH Clone Command
` git clone git@github.com:username/repository-name.git `
Requires SSH key authentication; no password prompts after setup.
GitHub CLI Clone Command
` gh repo clone username/repository-name `
Shortest syntax; uses your gh auth credentials automatically.
Expected Output
` Cloning into 'repository-name'... remote: Counting objects: 143, done. remote: Compressing objects: 100% (98/98), done. Receiving objects: 100% (143/143), 12.00 KiB | 2.40 MiB/s, done. Resolving deltas: 100% (43/43), done. `
Purpose
The clone command downloads the entire git repository including all branches and version history to your machine.
Step Six: How Do You Clone Using GitHub Desktop?
Open GitHub Desktop, select File > Clone Repository, paste the URL or choose from your repository list, select a local path, and click Clone.
Action
- File > Clone Repository (or Ctrl+Shift+O)
- Paste URL in the URL tab or select from GitHub.com tab
- Click Choose… to set local path
- Click Clone
Expected Result
Progress bar shows download status.
Repository appears in the left sidebar when complete.
Alternative Method: How Do You Clone a Specific Branch?
Use the -b flag to clone only one branch instead of the default main or master branch.
Command
` git clone -b branch-name https://github.com/username/repository-name.git `
When to Use
- Working on a feature branch specifically
- Testing a release branch before deployment
- Avoiding download of unnecessary branches
Alternative Method: How Do You Perform a Shallow Clone?
Add –depth 1 to clone only the latest commit without full history; reduces download size by 50-90% on large repositories.
Command
` git clone --depth 1 https://github.com/username/repository-name.git `
When to Use
- Continuous integration pipelines needing fast clones
- Limited disk space situations
- Repositories with large binary files in history
Limitation
You cannot access older commits or run git log on full history.
Use git fetch –unshallow later if needed.
Verification
Confirm the clone worked by navigating into the new directory and checking git status.
Verification Commands
` cd repository-name ls # List files (Mac/Linux)
dir # List files (Windows)
git status # Check Git tracking
git remote -v # Confirm remote connection
`
Expected Output for git remote -v
` origin https://github.com/username/repository-name.git (fetch) origin https://github.com/username/repository-name.git (push) `
The origin remote should point to the GitHub URL you cloned from.
Troubleshooting
Permission Denied (publickey)
Cause: SSH key not configured or not added to GitHub.
Solution: Generate a new SSH key with ssh-keygen -t ed25519, then add the public key to GitHub Settings > SSH and GPG Keys.
Repository Not Found
Cause: Typo in URL, private repo without access, or repo deleted.
Solution: Double-check spelling; verify you have repository access; try HTTPS if SSH fails.
SSL Certificate Problem
Cause: Corporate firewall or outdated Git version.
Solution: Update Git to latest version; or run git config –global http.sslVerify false temporarily (not recommended for production).
Slow Clone Speed
Cause: Large repository with extensive history or big files.
Solution: Use shallow clone with –depth 1; check network connection; try cloning during off-peak hours.
Authentication Failed
Cause: Wrong credentials or expired personal access token.
Solution: Generate new token in GitHub Settings > Developer settings > Personal access tokens; use token as password when prompted.
Next Steps
After cloning, you’ll typically want to create a new branch, make changes, and push your code back to GitHub.
Common Post-Clone Actions
- Create a new branch for your feature or fix
- Pull latest changes from the remote repository
- Commit your changes with descriptive messages
- Set up upstream tracking for forked repositories
Related Processes
- Forking a repository to create your own copy on GitHub
- Resolving merge conflicts when collaborating with others
- Switching between branches in your local clone
- Updating your repository with remote changes
FAQ on How To Clone A Github Repository
What is the difference between cloning and forking a repository?
Cloning downloads a repository to your local machine while maintaining a connection to the original remote.
Forking creates a separate copy under your GitHub account. Clone for local work; fork when you want your own version to modify independently.
Can I clone a private GitHub repository?
Yes, but you need proper access permissions. Use HTTPS with a personal access token or SSH with your configured key.
Repository owners must grant you collaborator access first.
How do I clone a repository to a specific folder?
Add the destination folder name after the URL: git clone https://github.com/user/repo.git my-folder-name.
Git creates that folder and places all files inside it instead of using the default repository name.
Why does my clone fail with “permission denied”?
This error typically means SSH authentication failed. Your SSH key may not be added to GitHub or the key agent is not running.
Switch to HTTPS cloning or reconfigure your SSH setup.
How long does it take to clone a repository?
Small repositories clone in seconds. Large projects with extensive version control history may take several minutes.
Use –depth 1 for faster shallow clones when full history is not needed.
Can I clone only part of a repository?
Git supports sparse checkout to clone specific directories. First clone with –filter=blob:none –sparse, then use git sparse-checkout set folder-name.
Useful for monorepos with multiple projects.
What happens to my clone if the original repository is deleted?
Your local clone remains intact with all files and history. However, you lose the ability to push or pull from that remote.
You can add a new remote URL if the project moves elsewhere.
How do I clone a repository with all its submodules?
Add the –recurse-submodules flag: git clone –recurse-submodules https://github.com/user/repo.git.
This downloads the main repository and initializes all linked submodule repositories automatically.
Is cloning the same as downloading a ZIP file?
No. Cloning preserves Git history, branches, and remote connections. ZIP downloads give you only the current files.
You cannot push changes or track versions with a ZIP download.
How do I update a cloned repository with new changes?
Use git pull to fetch and merge remote changes into your local branch.
Run this command regularly to keep your local copy synchronized with the remote repository on GitHub.
Conclusion
You now know how to clone a GitHub repository using four different methods. Pick HTTPS for quick access, SSH for daily workflows, or GitHub Desktop if you prefer visual tools.
The git clone command is your gateway to collaborative coding. Every pull request, every contribution to open-source starts here.
Practice with a public repository first. Clone it, explore the files, check the branch structure.
Once comfortable, move to private repos and team projects. Set up SSH keys to skip password prompts.
Cloning is just step one. The real work begins when you start making changes, pushing commits, and managing your source control workflow.
Keep this guide bookmarked for quick reference.