Most developers know Git. Far fewer know how to use the pull request workflow without running into merge conflicts, wrong base branches, or stalled reviews.
Knowing how to create a pull request in GitHub is a core skill for any team working with version control. It is the standard entry point for code review, branch merging, and tracked collaboration across every type of project.
This guide covers the full pull request process, from branch setup and opening a PR on GitHub.com to using the GitHub CLI, linking issues, requesting reviewers, choosing a merge strategy, and fixing the most common errors that block a merge.
What Is a Pull Request in GitHub?

A pull request is a request to merge code changes from one branch into another branch within a git repository. It creates a dedicated space for code review, inline comments, and approval before the merge commit lands in the base branch.
Pull requests exist at the repository level, not the account level. They are tied to commits on a compare branch, not to individual files.
According to GitHub’s Octoverse 2025 report, developers merged 43.2 million pull requests on average each month, a 23% year-over-year increase. That number reflects how central the pull request workflow is to modern software development.
| PR Type | Purpose | Merge Ready? |
|---|---|---|
| Ready for Review | Indicates the code is complete and ready for feedback or approval | Yes |
| Draft Pull Request | Marks the pull request as work-in-progress and not ready for formal review | No |
| Fork-based PR | Accepts contributions coming from an external repository fork | Yes, after review and approval |
How Does a Pull Request Differ from a Direct Merge?
Key difference: A direct merge skips the review process entirely. A pull request enforces a structured review cycle before any commit history changes the base branch.
With branch protection rules enabled, direct pushes to main are blocked. The pull request becomes the only path to merge.
The code review process built into pull requests reduces defect rates. A 2015 IEEE study found that peer-reviewed code has significantly fewer post-release defects than unreviewed code.
What Is the Difference Between a Pull Request and a Merge Request?
Same concept, different names. GitHub calls it a pull request. GitLab calls it a merge request.
Both represent a formal proposal to merge one branch into another, with a built-in review and approval workflow. The underlying git merge operation is identical.
What Are the Requirements Before Opening a Pull Request?
3 things must exist before a pull request can be created: a repository with appropriate access permissions, a branch with at least 1 commit that differs from the base branch, and a GitHub account.
Without these in place, GitHub either blocks the PR or displays a “no commits between base and compare” error.
Repository Access and Permissions
For public repositories: anyone can fork and open a PR against the upstream base branch.
For private repositories: the contributor needs explicit write access or an invitation from the repository owner.
Organization-level repositories often use team-based permissions. A developer with read-only access cannot push a branch, which means they cannot open a PR from that repository directly.
Branch Requirements Before Creating a Pull Request
The compare branch must have at least 1 commit that does not exist on the base branch. GitHub computes the git diff between the 2 branches to display the code changes in the PR.
- Base branch: the branch receiving the changes (often
mainordevelop) - Compare branch: the branch carrying the new commits
- At least 1 diverging commit required
If the compare branch is identical to the base branch, the “Compare & pull request” button will not appear.
Status Checks and Branch Protection Awareness
Opening a pull request does not require passing CI/CD checks. But merging may be blocked by required status checks if branch protection rules are configured.
Know your repository’s protection rules before opening the PR. Codacy’s 2024 State of Software Quality report found that 49% of teams conduct code reviews for every pull request, with 15% doing non-blocking reviews on top of that.

How to Create a Branch for a Pull Request

A branch is a hard dependency for any pull request. Without a separate branch with at least 1 diverging commit, there is nothing to propose merging.
Graphite research shows the median active developer’s PR takes 9 hours from publish to merge. Branches with clear naming conventions and focused commits move through review faster.
Creating a Branch Locally and Pushing to GitHub
Run git checkout -b branch-name to create and switch to a new branch in one command. Make your changes, stage them with git add, commit with a descriptive message, then push with git push origin branch-name.
Common branch naming conventions used by most teams:
feature/user-authenticationfix/broken-login-redirecthotfix/null-pointer-exceptionchore/update-dependencies
Descriptive branch names give reviewers context before they read a single line of code.
Creating a Branch Directly on GitHub.com
Process: Navigate to the repository, click the branch selector dropdown, type a new branch name, and select “Create branch.”
GitHub creates the new branch from the currently selected base branch. Any commits made via the GitHub web editor on that branch are immediately push-ready for a pull request.
This approach suits quick documentation fixes or minor config changes. For anything involving local build steps or testing, create the branch locally instead.
How to Open a Pull Request on GitHub
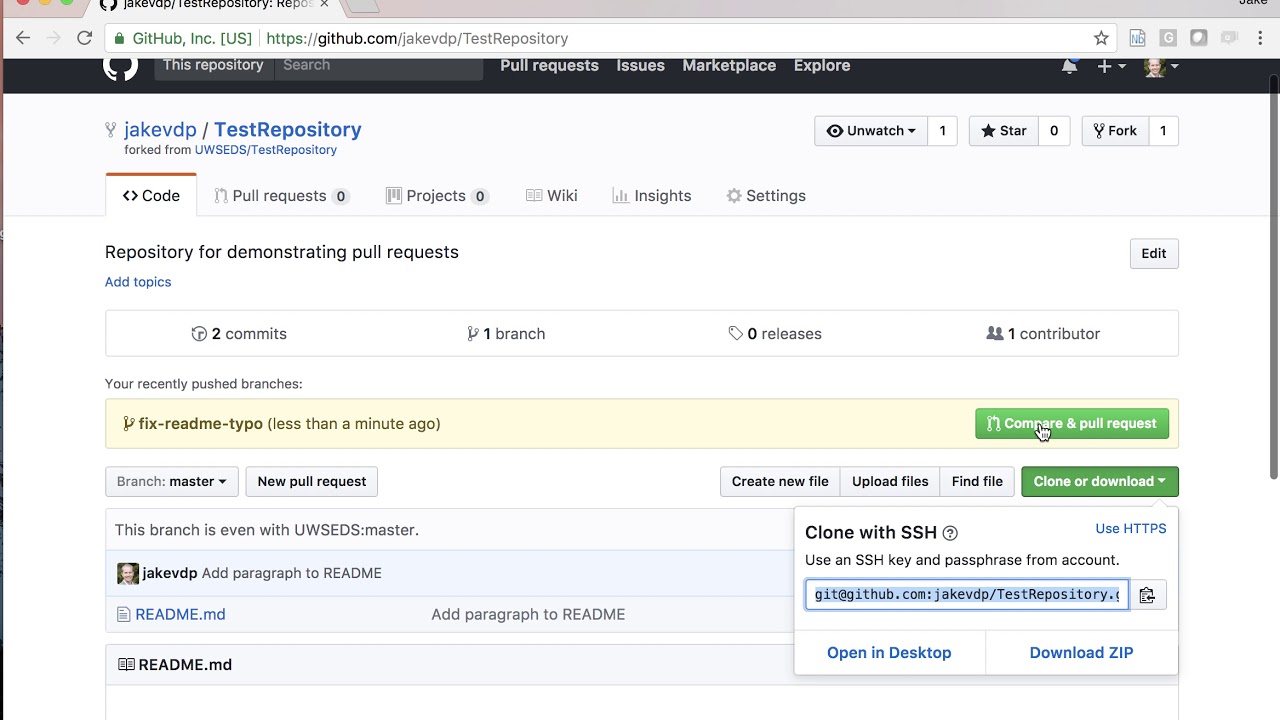
After pushing a branch to GitHub, a yellow banner appears at the top of the repository with a “Compare & pull request” button. Click it. GitHub pre-selects the base and compare branches based on your recent push.
According to GitHub’s Octoverse 2025, developers created more than 230 new repositories every minute in 2025, with pull request activity up 20% year-over-year. The web interface handles the vast majority of this PR creation volume.
Selecting Base and Compare Branches
The base branch is where changes will land after merge. The compare branch is where your commits currently live.
| Branch Role | Typical Value | Can Be Changed? |
|---|---|---|
| Base branch | main or develop | Yes, using the branch selector dropdown |
| Compare branch | Your feature branch | Yes, using the branch selector dropdown |
If the wrong base branch is selected, change it before submitting. Changing the base branch after a PR is open is possible but resets the diff and may confuse reviewers already mid-review.
Writing the Pull Request Title and Description
The title should describe what changed, not how. “Add OAuth2 login support” is useful. “Update auth.js” is not.
The description field supports markdown. Use it to cover 3 things:
- What changed: a summary of the code changes
- Why it changed: the problem being solved or feature being added
- Testing notes: how the change was verified
A LinearB study found that half of all pull requests are idle for at least half their lifespan. A clear, complete description significantly reduces back-and-forth and idle time.
Choosing Between Draft and Ready-for-Review
Submit as a draft pull request when the implementation is incomplete but you want early feedback, CI to run, or a placeholder in the PR queue.
Submit as ready-for-review when the code is complete and tested. Reviewers get notified immediately on ready-for-review submission, not on draft creation.
Converting a draft to ready-for-review is one click in the PR sidebar. There is no need to close and reopen.
How to Create a Pull Request from a Fork
Fork-based pull requests are the standard workflow for open-source contributions. You do not have write access to the original repository, so you fork it, make changes in your copy, and open a PR from your fork’s branch to the upstream base branch.
GitHub’s Octoverse 2024 report noted 1.4 million new developers globally joined open source. The fork-and-pull model is the primary entry point for first-time contributors.
Setting Up the Fork and Upstream Remote
Step 1: Fork the repository to your GitHub account via the “Fork” button.
Step 2: Clone your fork locally with git clone https://github.com/your-username/repo-name.git.
Step 3: Add the original repository as an upstream remote to keep your fork in sync:
git remote add upstream https://github.com/original-owner/repo-name.git
This 3-step setup is required before making any changes. Skipping the upstream remote means you cannot easily sync with changes in the original repository later.
Opening the Pull Request from Fork to Upstream
Push your changes to your fork’s branch. Then navigate to the original repository on GitHub.com, not your fork. GitHub detects the recent push and displays the “Compare & pull request” banner.
The base repository will be the original. The base branch is typically main. The compare repository is your fork, and the compare branch is your feature branch.
Check the “Allow edits from maintainers” box. This lets project maintainers push small fixes directly to your branch, which speeds up the merge process significantly.
Understanding what a fork in GitHub actually is makes this workflow much easier to reason about before you start.
How to Create a Pull Request Using GitHub CLI

GitHub CLI (gh) lets you create, view, and merge pull requests without leaving the terminal. For developers who spend most of their time in a local environment, this removes the context switch to the browser entirely.
The gh pr create command is the core of the CLI pull request workflow. It triggers an interactive prompt or accepts flags for non-interactive use.
Installing and Authenticating GitHub CLI
Install: Download from cli.github.com or use a package manager (brew install gh on macOS, winget install GitHub.cli on Windows).
Authenticate: Run gh auth login and follow the prompts. Choose HTTPS or SSH, then authenticate via browser or token.
After authentication, gh uses the same permissions as your GitHub account. No separate API key management is needed.
Creating a Pull Request with gh pr create
From inside your local repository, run:
gh pr create --base main --head feature/your-branch --title "Your PR title" --body "Description here"
Key flags:
- –base
: the target branch
- –head
: your compare branch
- –draft
: opens as a draft pull request
- –assignee @me
: assigns the PR to yourself
Run gh pr status to see open PRs assigned to you, PRs you have reviewed, and PRs waiting on your review. All in one command.
For teams that rely on continuous integration pipelines, combining gh pr create with gh pr checks gives a full terminal-based PR workflow from branch creation to merge.
The full GitHub CLI guide covers installation, authentication, and advanced commands in detail. If you have not set it up yet, the GitHub CLI installation steps walk through every platform.
How to Link a Pull Request to a GitHub Issue

Linking a pull request to a GitHub issue means the issue closes automatically when the PR is merged. This keeps the git workflow clean and removes the manual step of closing related issues after deployment.
GitHub supports 6 closing keywords: closes, fixes, resolves, close, fix, resolve, each followed by a # and the issue number.
Where to Place Closing Keywords
Place the closing keyword in the pull request description body, not in the title and not in a commit message (commit message keywords only close issues on direct push to the default branch, not on PR merge).
Correct format in the PR description:
Closes #42 Fixes #87, Resolves #103
Multiple issues can be linked in a single PR description. Each keyword-issue pair closes the corresponding issue on merge.
Manual Linking via the Development Sidebar
Alternative method: In the PR’s right sidebar, find the “Development” section and click the gear icon. Search for the issue by number or title and select it.
This is useful when the PR description was written before the issue was created, or when the keyword-based auto-close behavior is not wanted but you still want traceability between the PR and the issue.
Note: if a PR is closed without merging, linked issues do not auto-close. The auto-close only triggers on merge into the repository’s default branch.
How to Request Reviewers and Assign a Pull Request

Requesting reviewers and assigning a pull request are 2 separate actions with different meanings. Both are set in the right sidebar after a PR is opened.
Codacy’s 2024 State of Software Quality report found 49% of teams conduct a code review on every single pull request. Getting reviewer assignment right is what makes that happen consistently.
Reviewers vs. Assignees
Reviewer: the person responsible for reviewing the code changes and approving or requesting edits.
Assignee: the person who owns the pull request and is accountable for driving it to merge.
A PR can have multiple reviewers but typically one assignee. Many teams set the PR author as the assignee by default.
Using CODEOWNERS to Auto-Assign Reviewers
GitHub’s CODEOWNERS file maps file paths to GitHub users or teams. When a PR modifies a file that has a designated owner, that owner is automatically requested as a reviewer.
Store the CODEOWNERS file in one of 3 locations: .github/CODEOWNERS, the root directory, or docs/CODEOWNERS. GitHub checks them in that order and uses the first one found.
Per GitHub Docs, if a PR modifies a file with multiple owners, approval from any single code owner satisfies the requirement when “Require review from Code Owners” is enabled in branch protection.
GitHub released the required reviewer rule as generally available in February 2026, giving teams more granular control than CODEOWNERS alone. For example, SQL file changes can require a data platform team review, and authentication file changes can require 2 security team approvals before merge.
Labels, Milestones, and Project Board Assignment
Labels categorize the PR at a glance. Common labels used across most repositories:
- bug
/enhancement/documentation
- needs-review
/ready-to-merge
- breaking-change
Milestones group related PRs under a release or sprint goal. Assigning the PR to a GitHub Project board makes it visible in kanban-style tracking alongside issues.
How to Update a Pull Request After It Is Opened

Pushing new commits to the same branch updates the pull request automatically. No close and reopen needed.
A LinearB study found that half of all PRs sit idle for at least half their lifespan, often because update cycles stall. Knowing how to push changes, sync forks, and resolve conflicts cuts that idle time significantly.
Pushing New Commits to an Open Pull Request
Make your changes locally, commit them, and run git push origin your-branch. The PR updates instantly with the new commits added to the timeline.
Each new push triggers any configured continuous deployment or CI pipeline checks. If required status checks are configured on the base branch, all checks must pass against the latest commit SHA before merge is allowed. Checks triggered by a previous commit SHA do not count (GitHub Docs).
Stale review approvals: if “Dismiss stale pull request approvals when new commits are pushed” is enabled in branch protection, any existing approvals are dismissed after a new push. Reviewers need to re-approve.
Resolving Merge Conflicts in a Pull Request
Merge conflicts appear when the base branch has changed in the same lines your branch modified. GitHub shows a “This branch has conflicts that must be resolved” banner in the PR.
2 ways to resolve:
Via GitHub.com: click “Resolve conflicts,” edit the conflict markers directly in the browser editor, mark as resolved, then commit the merge.
Via local Git: fetch and merge the base branch locally, resolve conflicts in your editor, commit the resolution, then push. This approach is better for complex conflicts involving multiple files.
Learning how to resolve merge conflicts in Git covers the local resolution workflow in full detail, including using git mergetool for side-by-side comparison.
Converting a Draft PR to Ready-for-Review
One click in the PR sidebar. Find “Ready for review” at the bottom of the right column and click it.
Reviewers receive a notification at this point, not when the draft was first opened. This is the intended behavior: draft PRs are for work-in-progress visibility, not review requests.
Teams using build pipelines often open PRs as drafts early so CI starts running against the branch, then convert to ready-for-review once all checks are green.
How to Merge a Pull Request in GitHub

GitHub provides 3 merge strategies. Each produces a different commit history outcome. The right choice depends on your team’s branching model and how much commit-level detail matters post-merge.
| Strategy | What It Does | Best For |
|---|---|---|
| Merge commit | Preserves all branch commits and adds a dedicated merge commit | Full history preservation |
| Squash and merge | Combines all branch commits into a single commit before merging | Clean and simplified main branch history |
| Rebase and merge | Replays commits individually onto the target branch without creating a merge commit | Linear history while keeping individual commit details |
Merge Commit vs. Squash and Merge vs. Rebase and Merge
Merge commit is GitHub’s default. Every commit from the feature branch lands on the base branch, plus a merge commit that marks where the branch was integrated. Revert the entire feature with a single git revert -m 1 [merge-commit-sha].
Squash and merge combines all commits into a single commit on the base branch. The individual commit history of the branch is discarded. Good when branch commits are messy (“WIP”, “fix typo”, “actually fix typo”) and the noise is not worth keeping.
Rebase and merge replays each commit individually on top of the base branch without a merge commit. The result is a linear commit history. Per GitHub Docs, rebase and merge on GitHub always updates committer information and creates new commit SHAs, which differs from a local git rebase.
Repository admins can restrict which strategies are available in Settings under “Pull Requests.” If only squash merging is enabled, all PRs in the repository are merged that way.
Permissions Required to Merge
Write permissions are required to merge a pull request. For squash and merge, the repository must also explicitly allow squash merging. For rebase and merge, the repository must allow rebase merging.
Branch protection rules can add further requirements: a minimum number of approving reviews, required status checks passing, and no unresolved conversations before the merge button turns green.
Deleting the Branch After Merge
GitHub offers a “Delete branch” button immediately after merge. Most teams enable auto-delete on merge in repository settings, so this happens without manual action.
Deleted branches can be restored via the “Restore branch” button in the closed PR for up to 90 days. The commit history remains in the base branch regardless of branch deletion.
Teams that maintain long-running branches (like release/v2 or develop) should skip auto-delete for those branches specifically, which is managed through branch protection rules.
What Are Common Pull Request Errors and How to Fix Them?
4 errors block most pull requests from merging: wrong branch selection, merge conflicts, review requirements, and failing CI checks. Each has a direct fix.
GitHub’s source control management workflow surfaces these errors directly in the PR interface. None require closing and reopening the pull request to resolve.
“No Commits Between Base and Compare”
This error appears before the PR is even created. It means the compare branch and base branch have identical commit history.
Cause: wrong branch selected as compare, or commits were not pushed before opening the PR.
Fix: verify the compare branch has diverging commits with git log base..compare. If commits exist locally but not on GitHub, run git push origin branch-name first.
Merge Conflicts Blocking the PR
GitHub flags merge conflicts with a yellow warning banner. The PR stays open but cannot be merged until the conflicts are resolved.
Root cause: the base branch received commits that modified the same lines as the compare branch after the feature branch was created.
| Resolution Method | When to Use | Risk Level |
|---|---|---|
| GitHub web editor | Single-file conflicts and simple merge changes | Low |
| Local Git resolution | Multi-file conflicts and complex merge scenarios | Medium |
After resolving locally, force-push only if you used git rebase to sync the branch. For a regular merge resolution, a standard push is sufficient.
“Review Required” Blocking Merge
This block comes from branch protection rules, not from GitHub itself. The repository admin has set a minimum number of required approving reviews before merge is allowed.
What reviewers see: 3 review states are available: “Approve,” “Request changes,” and “Comment.”
A single “Request changes” review blocks the merge even if other reviewers have approved. The reviewer who requested changes must either approve or have their review dismissed by someone with admin permissions.
Understanding how to approve a pull request in GitHub covers the reviewer workflow from the other side of the process.
Failed Status Checks Blocking Merge
Required status checks are configured per branch in branch protection rules. All required checks must pass against the latest commit SHA. A check that passed on a previous commit does not count (GitHub Docs).
Common reasons a check fails or stays pending:
- CI pipeline triggered by an old commit SHA
- Workflow skipped due to path filtering, leaving the check in “Pending” state
- The branch is out of date with the base branch and the protection rule requires it to be current
To re-trigger checks without making a code change: close and reopen the PR, or push an empty commit with git commit –allow-empty -m “trigger CI” and push.
If the “This branch is out of date” warning appears, click “Update branch” in the PR interface or run git pull origin main locally, then push. Teams using deployment pipelines tied to merge events should also verify the pipeline re-triggers correctly after the branch update.
FAQ on How To Create A Pull Request In Github
What is a pull request in GitHub?
A pull request is a proposal to merge commits from one branch into another. It creates a structured space for code review, inline comments, and approval before the merge commit lands in the base branch.
How do I open a pull request on GitHub?
Push your branch to GitHub, then click “Compare & pull request” in the repository. Select the correct base branch and compare branch, write a title and description, then submit as draft or ready for review.
What is the difference between a draft pull request and a ready-for-review pull request?
A draft pull request signals work-in-progress. Reviewers are not notified until you convert it to ready for review. CI checks still run on draft PRs. One click in the sidebar converts it.
How do I create a pull request from a fork?
Fork the repository, clone your fork locally, add the upstream remote, push changes to your fork’s branch, then open a PR from your fork to the upstream base branch via the original repository page on GitHub.
How do I create a pull request using GitHub CLI?
Run gh pr create from inside your local repository. Use –base, –title, and –body flags for non-interactive use. Add –draft to open as a draft. Authenticate first with gh auth login.
How do I link a pull request to a GitHub issue?
Add a closing keyword followed by the issue number in the PR description body. Supported keywords include closes, fixes, and resolves. The linked issue closes automatically when the pull request is merged into the default branch.
What are the three merge strategies in GitHub?
GitHub offers merge commit, squash and merge, and rebase and merge. Merge commit preserves full history. Squash combines all commits into one. Rebase replays commits individually, producing a linear commit history without a merge commit.
How do I resolve a merge conflict in a pull request?
Use the GitHub.com conflict editor for simple single-file conflicts. For complex cases, merge the base branch locally, resolve conflicts in your editor, commit the resolution, and push. The PR updates automatically with the resolved commit history.
Why is my pull request blocked from merging?
4 common blockers: no required reviewer approvals, failing status checks, unresolved conversations, or an out-of-date branch. Check the PR merge box for the specific message. Each blocker has a direct fix without closing the PR.
Can I update a pull request after it is opened?
Yes. Push additional commits to the same compare branch and the PR updates automatically. Each push re-triggers CI checks. If stale review dismissal is enabled in branch protection, existing approvals reset after each new push.
Conclusion
This conclusion is for an article presenting the full pull request workflow in GitHub, from branch setup and fork configuration to merge strategy selection and conflict resolution.
The pull request review process is where most of the real collaboration happens. Getting it right means fewer idle PRs, faster merge cycles, and cleaner commit history across the remote repository.
Whether you use the GitHub web interface, the Git command line, or the CLI, the underlying workflow is the same. Push a branch, open a PR, request reviewers, pass your status checks, and merge.
Small habits compound. Clear PR descriptions, consistent branch naming, and linked issues make a measurable difference to any team’s git workflow over time.

- MongoDB Cheat Sheet - October 20, 2026
- Adding AI Video Generation to a Software Product: Architecture, Cost Guardrails and QA - October 20, 2026
- Show Hidden Characters, Spaces, and Line Endings in Notepad++ - October 19, 2026