
Every Git commit starts with a choice. Not what to change, but what to include.
That choice happens in the staging area, the layer between your working directory and your repository’s permanent history. Understanding what is staging in Git is what separates developers who use version control from developers who actually control their versions.
Most people learn git add and git commit in their first tutorial, then never think about the staging process again. That’s a mistake. The index (Git’s internal name for the staging area) gives you precise control over every snapshot you record.
This article covers how staging works, the commands you need, common mistakes to avoid, and how clean staging habits improve your team’s pull requests and commit history.
What Is Staging in Git
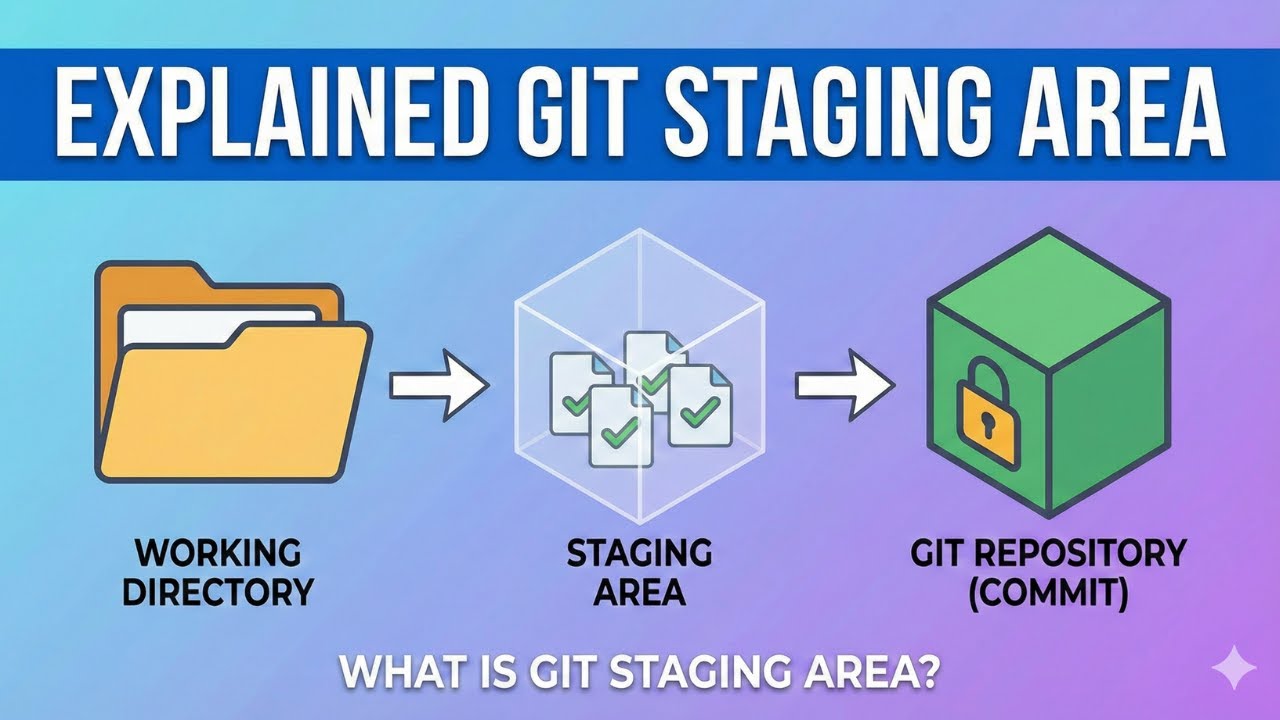
Staging in Git is the intermediate step between editing files and recording those edits permanently in your repository’s history. It’s where you decide exactly what goes into your next commit.
Think of it this way. You’ve changed five files. But only three of those changes are ready. The staging area lets you pick those three and leave the rest out.
Git calls this intermediate layer the index. When you run git add, you’re moving a snapshot of your changes into the index. The file isn’t committed yet. It’s just queued up, waiting.
This is different from how older version control systems worked. Tools like Apache Subversion (SVN) didn’t have a staging concept. You edited files and committed them directly to the central server. Git introduced a middle layer that gives developers control over what each commit actually contains.
The staging area sits between two other layers: the working directory (where you edit files on disk) and the repository (where committed snapshots live permanently). Every file in a Git project exists in one of three states: modified, staged, or committed.
According to the Stack Overflow Developer Survey 2024, 93.87% of professional developers use Git as their primary version control system. That’s up from 87.1% in 2016. And every one of those developers interacts with the staging area, whether they realize it or not.
How the Git Staging Area Works

When you run git add filename, Git doesn’t just flag the file. It creates a compressed blob object of the file’s content at that exact moment and writes a reference into the index file.
That snapshot is identified by a SHA-1 hash, a 40-character string unique to that specific content. Change even one character in the file, and the hash changes completely.
The index file itself is a binary file stored at .git/index. It contains a flat list of every tracked file along with metadata like permissions, timestamps, and the SHA-1 hash pointing to each file’s staged content. It’s basically a proposed next commit.
Hutte research found that 85% of developers say Git has improved collaboration within their teams. The staging area is a big part of why. It lets each developer craft precise, well-organized commits before sharing changes with anyone else.
The Relationship Between Working Directory, Staging Area, and Repository
Changes flow in one direction: edit in the working directory, stage with git add, commit with git commit.
Running <code>git status</code> shows you exactly where each file sits across these three layers. Modified but unstaged files appear in red. Staged files show in green. Committed files don’t show up at all, because there’s nothing pending.
Why separate these layers? Because a direct edit-to-commit workflow gives you zero control over commit granularity. The staging area is what makes Git workflows flexible enough for solo projects and massive distributed teams alike.
Why Git Uses a Staging Area

Partial commits. That’s the short answer.
You might have a dozen modified files across your working directory. Some changes fix a bug. Others add a feature. Others are just cleanup. Without staging, you’d have to commit everything together, or not at all.
The staging area lets you group related changes into a single, logically coherent commit. Bug fix in one commit. Feature addition in another. Cleanup in a third. Each one tells a clear story in your project history.
This matters more than most beginners think. According to Hutte, 80% of senior developers recommend committing changes frequently with small, incremental commits. You can’t do that cleanly without the staging area.
SVN didn’t have this. Mercurial didn’t have this (at least not natively). Linus Torvalds built it into Git from the beginning because he needed it to manage Linux kernel development, where thousands of contributors submit changes across millions of lines of code.
The version control systems market reflects how much this design matters. Grand View Research valued the global VCS market at $1.03 billion in 2024, projected to reach $2.66 billion by 2030. Git’s architecture, staging included, is a big reason it dominates that market.
Common Git Commands for Staging
Here’s what you actually use day to day.
| Command | What It Does | When to Use It |
|---|---|---|
| git add file.txt | Stages a single file | Most common staging action |
| git add . | Stages all changes in current directory | Quick but risky if you’re not careful |
| git add -A | Stages all changes including deletions | Full working tree sync to index |
| git add -p | Interactive patch mode | When you need line-level control |
| git reset HEAD file | Unstages a file | When you staged something by mistake |
| git restore –staged file | Newer unstage command | Git 2.23+ preferred syntax |
The difference between git add . and git add -A trips people up. git add . stages new and modified files in the current directory and below. git add -A stages everything across the whole working tree, including file deletions.
Took me a while to get that straight. Your mileage may vary, but I’d recommend just using git add -A when you want everything and git add specific-file when you don’t.
For a full breakdown of what <code>git add</code> does under the hood and its various flags, there’s more to cover than most people expect.
Staging Individual Lines with Interactive Staging
git add -p is one of those commands that separates people who sort of know Git from people who actually know Git.
It walks through each changed “hunk” in your files and asks what to do with it. You get options:
- y – stage this hunk
- n – skip this hunk
- s – split into smaller hunks
- e – manually edit the hunk
This is how you commit only specific lines from a file while leaving other changes in that same file unstaged. Extremely useful when you’ve been working on two things in the same file and need to separate them into distinct commits.
About 60% of development teams use a feature-branch workflow, according to Hutte’s research. In that setup, clean and focused commits per branch are expected. Patch mode is how you get there when your working directory is messy.
Staging vs Committing in Git

Staging collects changes. Committing records them permanently.
You can stage files multiple times before making a single commit. Each time you run git add, you’re updating the index with the latest snapshot of that file. The previous staged version gets replaced.
Here’s a detail that catches a lot of people. If you stage a file and then edit it again, your commit will contain the staged version, not the latest edit. Git doesn’t auto-update the staging area when you save a file. You have to re-run git add.
This is by design. It forces you to be intentional about what goes into each commit. But if you forget to re-stage, you end up with a commit that doesn’t match your working directory, and that’s confusing when you review your commit history later.
| Aspect | Staging | Committing |
|---|---|---|
| What it does | Queues changes in the index | Records a permanent snapshot |
| Reversible? | Yes, with git reset or git restore –staged | Harder (requires git revert or git reset) |
| Part of history? | No | Yes |
| Can repeat? | Stage as many times as needed | Each commit is a distinct snapshot |
GitHub’s Octoverse 2025 report found that developers pushed nearly 1 billion commits in 2025, a 25% increase year over year. Every single one of those commits started with staging.
How to View Staged Changes

Never commit blind. Always review what’s in the staging area first.
git diff --staged (or the older alias --cached) shows a line-by-line diff of everything currently staged versus the last commit. This is your pre-commit review. Green lines are additions. Red lines are deletions.
<code>git diff</code> without the --staged flag shows something different. It compares your working directory to the staging area. So if you’ve modified a file but haven’t staged it yet, that’s where it shows up.
Partially staged files appear in both outputs. The staged portion shows in git diff --staged. The unstaged portion shows in plain git diff. Confusing until you understand the three-layer model, then it clicks.
GUI Tools That Visualize Staging
Not everyone works from the terminal, and that’s fine.
VS Code’s Source Control panel: Stage and unstage individual files or even specific lines with a click. The inline diff view is genuinely good for reviewing changes before committing. If you’re using VS Code as your editor, this is already built in.
JetBrains IDEs (IntelliJ IDEA, PyCharm) take a slightly different approach with changelists. They group changes into named sets, which maps to the staging concept but with extra organizational layers. Worth learning if you use PyCharm daily.
GitHub Desktop uses file-level checkboxes. Simple and visual, though it doesn’t support line-level staging like the terminal or VS Code. GitKraken and Sourcetree offer similar visual staging with drag-and-drop interfaces.
All of these tools call the same underlying Git commands. The staging area, the index file, the SHA-1 hashes: it’s all identical underneath. The GUI is just a different way to interact with the same source control mechanics.
Mistakes Developers Make with Git Staging
Staging errors are some of the most common Git problems, and they happen to experienced developers just as often as beginners. The difference is that experienced developers know how to fix them faster.
Hutte research shows 60% of developers have accidentally committed unintended file changes or secrets to their repository. That’s not a beginner stat. That’s the majority of the profession.
Accidentally Staging Sensitive Files
Config files with API keys. .env files with database passwords. Build artifacts that bloat the repository. These get staged constantly because git add . grabs everything.
GitHub reported detecting over 39 million leaked secrets in 2024, a 67% increase from the year before, according to their official security blog. Most of these came from developers staging and committing credentials they didn’t mean to include.
The fix is a properly configured <code>.gitignore</code> file. Set it up before your first commit on any project, not after you’ve already pushed secrets to a remote repository.
Forgetting to Re-stage After Edits
This one is sneaky. You stage a file, keep working on it, then commit. Your commit contains the old staged version, not your latest edits.
Git doesn’t auto-update the staging area. That’s intentional (it gives you control), but it catches people off guard regularly.
Run git status before every commit. If a file appears in both the “staged” and “modified” sections, you have a split. Either re-stage or accept that only the earlier snapshot goes into the commit.
Using <code>git add .</code> Without Reviewing
Hutte data shows roughly 87% of Git users have encountered merge conflicts at some point. A lot of those conflicts trace back to sloppy staging, where developers blindly add everything rather than reviewing what’s actually changed.
Safer alternatives:
- Run
git statusfirst to see what’s pending - Stage files individually:
git add specific-file.js - Use
git add -pfor line-level control
The Linux kernel team, managing a codebase that crossed 40 million lines in early 2025, enforces strict commit discipline. Contributors rarely use blanket git add commands on a project that massive.
The Staging Area in Git GUIs and IDEs
Not every developer lives in the terminal. According to the 2025 Stack Overflow Developer Survey, 75.9% of developers use Visual Studio Code as their primary editor. Most of those developers interact with Git staging through a graphical interface, not command-line tools.
The underlying mechanics are identical regardless of interface. GUI tools call the same Git commands under the hood. The difference is how they present the information.
| Tool | Staging Method | Line-Level Staging | Best For |
|---|---|---|---|
| VS Code | Click icons in Source Control panel | Yes | General development |
| IntelliJ / PyCharm | Changelists with drag and drop | Yes | Java, Python projects |
| GitHub Desktop | File-level checkboxes | No | Beginners, simple workflows |
| GitKraken | Visual diff with stage buttons | Yes | Visual learners, complex repos |
| Sourcetree | Drag files between panels | Yes | Atlassian/Bitbucket users |
How VS Code Handles Staging
The Source Control panel in VS Code shows modified files with a one-click stage button (the + icon). Click it, and the file moves from “Changes” to “Staged Changes.” It’s git add with a mouse.
Where it gets powerful is inline staging. Open a file’s diff view, select specific lines, and stage just those. That’s the equivalent of git add -p without memorizing hunk commands. If you want to connect VS Code to GitHub, the integration makes push and pull operations just as visual.
JetBrains Approach to Staging
Changelists are how IntelliJ IDEA and PyCharm handle the staging concept. Instead of a single staging area, JetBrains IDEs let you organize changes into named groups.
You might have a “Bug Fix” changelist and a “Refactor” changelist open at the same time. When you commit, you pick which changelist goes into the commit. It maps to the same Git index underneath, but the organizational layer on top is different.
Among Java developers specifically, IntelliJ IDEA usage rose from 71% in 2024 to 84% in 2025, according to the Java Developer Productivity Report. Most of those developers use the built-in changelist system rather than terminal-based staging.
When Terminal Staging Still Wins
GUIs have limits. Scripting, automation, and continuous integration pipelines all run Git from the command line.
If you’re writing a pre-commit hook that validates staged files, you need git diff --staged --name-only. No GUI does that for you. Same goes for build pipelines that check staged content before allowing a push.
The real answer is to know both. Use the GUI when it’s faster (reviewing large diffs, staging specific lines) and the terminal when you need precision or automation.
Staging in Team Workflows and Branching Strategies
Solo staging habits don’t matter much. Team staging habits matter a lot.
When you push to a shared branch, every commit becomes someone else’s problem to read, review, and potentially debug. Sloppy staging creates sloppy commits, and sloppy commits create pull requests that nobody wants to review.
How Clean Staging Produces Better Pull Requests
Codacy’s 2024 State of Software Quality report found that code reviews happen on every pull request in 49% of teams. That means roughly half of all development teams inspect every commit you push.
A pull request full of unfocused commits (one commit that mixes a bug fix, a style change, and a dependency update) makes the reviewer’s job harder. Research compiled by SalientPR shows PRs under 250 lines receive 60% faster reviews than larger changes.
Staging is how you control commit scope. One bug fix staged and committed separately from one feature change. Your reviewers will thank you.
Staging Before Rebasing and Squashing
Workflow sequence that experienced teams follow:
- Work on a feature branch with multiple small commits
- Before merging, use interactive rebase to clean up history
- Squash related commits into logical units
The staging area plays a role here because squashing commits sometimes requires re-staging changes. During an interactive rebase, Git may pause to let you re-organize what goes into each rewritten commit.
GitHub’s Octoverse 2025 report shows developers merged an average of 43.2 million pull requests per month in 2025, up 23% year over year. Each of those merges works better when the underlying commits are well-organized from clean staging.
How Staging Discipline Affects Git Log Readability
Run git log --oneline on any open source project. You’ll see one of two things.
A clean log looks like a story. Each commit message describes exactly one change. You can scan 50 commits and understand what happened over the past week. A messy log is noise: “WIP,” “fix,” “more fixes,” “actually fix the thing.” Useless for debugging and useless for the code review process.
Axolo’s analysis of GitHub enterprise data found that elite teams averaged 4 commits per developer per day with a median pull request lifetime under two hours. That kind of pace is only possible with staging discipline, where each commit is focused and each pull request tells a clear story.
Teams using Git Flow or trunk-based development both benefit from the same staging fundamentals. The branching model changes. The need for clean, intentional commits doesn’t.
FAQ on What Is Staging In Git
What does staging mean in Git?
Staging in Git means selecting specific file changes to include in your next commit. When you run git add, those changes move into the staging area (also called the index), where they wait until you commit them to the repository.
What is the difference between staging and committing?
Staging queues changes in the index without recording them permanently. Committing takes everything currently staged and saves it as a permanent snapshot in your Git history. You can stage multiple times before making a single commit.
Why does Git have a staging area?
The staging area gives you control over commit granularity. Without it, every modified file would go into every commit. Staging lets you group related changes together, keeping your commit history clean and each snapshot logically focused.
How do I stage files in Git?
Use git add filename for individual files or git add . for everything in the current directory. For line-level control, git add -p lets you stage specific hunks within a file using interactive patch mode.
How do I unstage a file in Git?
Run git restore --staged filename (Git 2.23 and later) or git reset HEAD filename in older versions. Both commands remove the file from the staging area without deleting your working directory changes.
How do I see what is currently staged?
Run git diff --staged to see a line-by-line diff of everything in the staging area compared to your last commit. Running git status also shows which files are staged, modified, or untracked.
Can I stage only part of a file?
Yes. Use git add -p to enter patch mode. Git breaks the file into hunks and lets you accept, skip, or split each one. This is how you commit specific lines while leaving other changes in that same file unstaged.
What happens if I edit a file after staging it?
Git keeps the originally staged version in the index. Your new edits only exist in the working directory. If you commit without re-staging, the commit will contain the older snapshot, not your latest changes.
Does the staging area exist in other version control systems?
Not typically. Older systems like SVN and Mercurial commit directly from the working directory. The staging area is a Git-specific concept that Linus Torvalds designed to give developers finer control over their version history.
Is staging the same as tracking a file in Git?
No. Tracking means Git knows a file exists in the repository. Staging means a specific change to a tracked (or new) file has been added to the index and is ready to be included in the next commit. Different concepts entirely.
Conclusion
Understanding what is staging in Git changes how you think about every commit. It’s not just a step in the workflow. It’s the mechanism that gives you full control over your project history.
The difference between a useful git log and a confusing one almost always comes down to staging habits. Developers who stage with intention produce focused commits, cleaner pull requests, and fewer merge conflicts.
Whether you stage from the terminal with git add -p` or through a GUI like GitKraken or GitHub Desktop, the fundamentals stay the same. Pick what belongs in the commit. Leave everything else out.
Your branching strategy doesn’t matter if your commits are messy. Start with better staging, and the rest of your distributed version control workflow gets easier from there.
Many of his resources are available on various design marketplaces and for free on Codepen.
Over the years, he's worked with a range of clients and contributed to design publications like Design Your Way, Designmodo, WebDesignerDepot, WPDean, Speckyboy, and Slider Revolution among others.
- How to Set Up Subscriptions on Google Play (Developer Guide) - July 12, 2026
- Why Work With a CMS Development Company for a Secure and Scalable Website? - July 12, 2026
- ADB Commands Cheat Sheet - July 11, 2026


