
Every developer eventually ships a bad commit. Maybe it breaks the build, maybe it tanks performance, maybe it just shouldn’t be there. The question is always the same: how do you undo it without making things worse?
That’s exactly what git revert answers. It’s a Git command that creates a new commit to reverse the changes from a previous one, all while keeping the commit history intact. No rewriting, no force pushing, no angry teammates.
This article covers how git revert works under the hood, how it compares to git reset and checkout, how to handle merge commit reverts, conflict resolution, and the common mistakes that trip up even experienced developers. You’ll also get a full command reference with every flag worth knowing.
What is Git Revert

Git revert is a command that undoes the changes from a specific commit by creating a brand new commit with the inverse of those changes. The original commit stays in the log. Nothing gets erased.
That last part is what trips people up. Took me a while to get it too. You’d think “revert” means “go back in time,” but it actually means “move forward with a fix.” The commit hash you target stays right where it is in the history.
The basic syntax looks like this:
git revert <commit-hash>
Run that, and Git opens your default editor so you can write a message for the new revert commit. If you don’t want that interruption, throw in the --no-edit flag and it skips the editor entirely.
RhodeCode data from 2025 shows Git usage among developers climbed to 93.87%, up from 87.1% in 2016. With that many people working in Git daily, revert is one of those commands you’ll reach for eventually, whether you plan to or not.
You can also revert a range of commits, not just one. But here’s the thing. Git processes them from newest to oldest by default, which matters when changes overlap.
The key distinction: git revert is a safe undo operation. Your codebase history grows forward, always. That’s what makes it the go-to choice on shared branches where other developers depend on the existing commit history.
How Git Revert Works Under the Hood

When you run git revert, Git doesn’t just delete lines. It calculates the inverse diff of the target commit.
If the original commit added 30 lines to a file, the revert commit removes those exact 30 lines. If it deleted a function, the revert puts it back. The diff gets flipped, applied to the current HEAD, and wrapped into a new commit object.
What Happens to the Repository
Commit history: Grows by one commit. The new commit references the reverted one in its default message (something like “Revert ‘Add login feature'”).
Working directory: Updated to reflect the reverted state. Your files change on disk immediately after the command completes.
Staging area: The inverse changes are staged and committed automatically, unless you pass --no-commit, which leaves them staged but uncommitted.
This append-only behavior is what makes revert safe for team environments. According to research from the University of California, Irvine, roughly 19.3% of all merge operations across open-source projects result in conflicts. Revert’s history-preserving approach avoids adding to that number by keeping the commit graph clean and linear for other contributors.
The Commit Graph After a Revert
Think of it as undo-by-addition. Your Git repository commit graph gets a new node, not a rewritten one.
Running git log after a revert shows both commits: the original and the revert. That full paper trail is exactly what you want when working with other people. No surprises, no missing commits.
Git Revert vs Git Reset

This is the single most common source of confusion in Git. I’ve seen senior developers mix these up.
Git revert creates a new commit. Git reset moves the branch pointer backward, which can effectively erase commits from the visible history.
| Feature | Git Revert | Git Reset |
|---|---|---|
| History | Preserved (new commit added) | Rewritten (commits removed) |
| Safe for shared branches | Yes | No (requires force push) |
| Targets | Specific commit(s) | HEAD position |
| Risk level | Low | Medium to high |
| Use case | Undo on public branches | Clean up local work |
The Stack Overflow 2024 Developer Survey drew over 65,000 responses from 185 countries, and version control remains the most universally adopted tool category among professional developers. With that many people collaborating through Git, the revert-vs-reset decision comes up constantly.
When Git Reset is the Better Choice
Reset wins in local-only scenarios. You haven’t pushed yet. Nobody else has seen those commits.
Soft reset (--soft): Moves HEAD back but keeps your changes staged. Good for squashing commits before pushing.
Mixed reset (--mixed): Moves HEAD back and unstages changes, but keeps them in your working directory. This is the default.
Hard reset (--hard): Erases everything. Changes gone from staging and working directory. Use with caution.
If you’ve already pushed commits to a remote repository, reset forces you into git push --force, which rewrites the history for everyone else. That breaks other developers’ local copies. Git revert avoids this problem entirely.
Git Revert vs Git Checkout
Another pair that gets mixed up, though less often than revert and reset.
Git checkout (or git switch and git restore in newer Git versions) moves your HEAD to a different commit or restores specific files. It doesn’t create a new commit.
Point checkout at a past commit, and you end up in a detached HEAD state. You’re looking at old code, but you’re not on any branch. It’s a read-only view of history, basically.
Practical Differences
Git revert stays on your current branch and records the undo as a new commit. Checkout jumps you somewhere else without recording anything.
Use revert when: You need to undo changes and share that undo with your team through a new commit.
Use checkout/restore when: You want to inspect an old state or restore individual files without affecting the branch’s commit history.
GitHub reached 150 million developers by 2025 and recorded over 5 billion contributions across public and private repositories in 2024. On projects that size, the difference between these commands matters. One wrong checkout on a shared pipeline can leave your teammates confused about what happened.
By the way, the Git team has been splitting checkout’s responsibilities into git switch (for changing branches) and git restore (for restoring files) since Git 2.23. The old command still works, but the new ones are clearer about intent.
How to Revert a Merge Commit
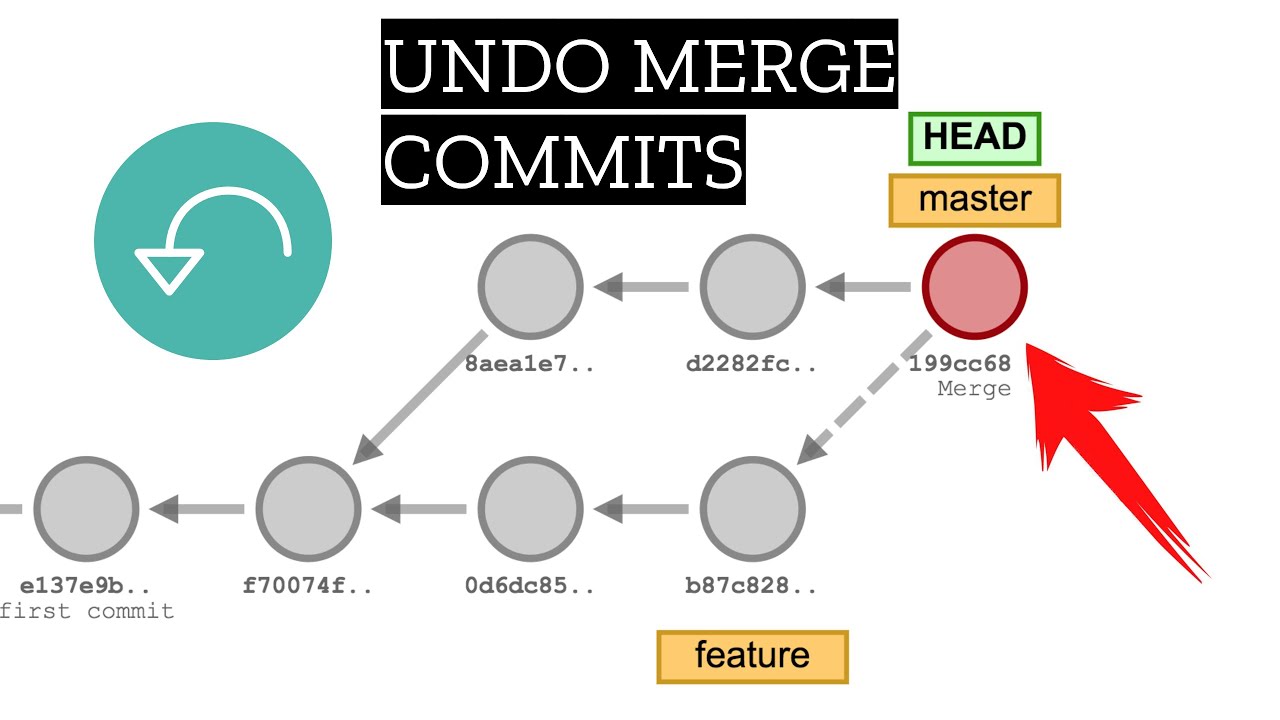
This is where git revert gets tricky. Merge commits have two parent commits instead of one, and Git doesn’t know which parent to revert to unless you tell it.
Try reverting a merge without specifying the parent and you’ll see this error:
error: commit is a merge but no -m option was given
The fix:
git revert -m 1 <merge-commit-hash>
The -m 1 flag tells Git to treat parent 1 (usually the mainline branch, like main or develop) as the base. Parent 2 is typically the feature branch that was merged in.
The Re-Merge Problem
Here’s something that catches almost everyone off guard the first time.
After you revert a merge, Git considers those changes as “already applied.” If you later try to merge the same branch again, Git sees nothing new to bring in. The changes just… don’t appear.
The workaround: revert the revert. You create a new commit that undoes the undo, which re-applies the original changes. Sounds circular, but it works. Then you can merge normally from that point.
Linus Torvalds himself wrote about this pattern when explaining how the Linux kernel team handles reverted merges. It’s a known quirk, not a bug.
Research from UCI found that in a dataset of 143 open-source projects with over 36,000 merge commits, about 19% produced conflicts. Reverting those merges (and potentially re-merging them later) adds another layer of complexity. Get the -m flag right and understand the re-merge trap, and you’ll handle it fine.
How GitHub and GitLab Handle Merge Reverts
Both GitHub and GitLab offer a “Revert” button on merged pull requests. Under the hood, these buttons run git revert -m 1 for you and open a new pull request with the result.
GitHub’s version works regardless of how the PR was merged (squash, rebase, or standard merge commit). GitLab’s revert button only appears for standard merge commits.
Good to know if your team uses one platform over the other.
Handling Conflicts During Git Revert
Reverts don’t always apply cleanly. If commits made after the one you’re reverting changed the same lines, you’ll hit a conflict.
Git pauses the revert and marks the conflict regions in the affected files with the standard conflict markers:
“ <<<<<<< HEAD current version of the code ======= what the revert wants to apply >>>>>>> parent of reverted commit `
Resolution Steps
Step 1: Open the conflicted files and decide which version to keep (or combine them manually).
Step 2: Stage the resolved files with git add.
Step 3: Continue the revert with git revert –continue.
If things go sideways and you want to start over, git revert –abort cancels the operation and puts everything back the way it was.
Using the –no-commit Flag
The –no-commit flag (or -n) is underrated. It stages the revert changes without auto-committing them.
Why this is useful: you can inspect exactly what the revert will change before committing. You can also batch multiple reverts into a single commit this way, which keeps the history cleaner if you’re rolling back a group of related changes.
A study published in the Journal of Systems and Software (2024) analyzed conflict resolution patterns across 208 open-source repositories and found that developers often face conflicts where automated tools produce incorrect merge results. The –no-commit approach gives you a chance to verify the revert result before it becomes permanent, something especially valuable when resolving merge conflicts on production-facing code.
One more thing. The –skip flag exists too. If you're reverting a range and one commit in the middle produces a conflict you don't care about, git revert –skip moves past it and continues with the next one.
Reverting Multiple Commits

Real projects rarely need just one commit undone. Bad deployments, broken features, a chain of related changes that all need to go. Git handles this, but the syntax needs attention.
The range syntax looks like this:
git revert ^..
That caret (^) after the oldest commit is easy to miss. Without it, Git excludes the oldest commit from the range. With it, the oldest commit gets included.
One at a Time vs. Batched
Default behavior: Git creates a separate revert commit for each commit in the range, processing from newest to oldest.
Batched with –no-commit: Adding -n stages all the inverse changes without committing any of them. You then wrap everything into a single commit.
The batched approach keeps your git log cleaner when rolling back five or ten commits at once. But if something conflicts halfway through, debugging gets harder because you can’t tell which revert introduced the problem.
Cascading Conflicts
Reverting a range often triggers conflicts that build on each other. Commit 5 changed the same file as commit 3, and now reverting both means Git can’t cleanly apply the second inverse diff.
The safer approach for large ranges: revert one commit at a time, resolve any conflicts, then move to the next. Slower, yes. But you’ll know exactly which revert caused trouble.
Research on open-source Java projects found that 56% of developers deferred resolving merge conflicts due to complexity, according to a study by Nelson et al. cited in the Journal of Systems and Software. Cascading conflicts from batch reverts add to that burden, which is why the one-at-a-time strategy usually wins for anything beyond three or four commits.
Git Revert in Team Workflows
Git revert exists because teams exist. If you worked alone, git reset would handle everything. But the moment other developers pull from the same branch, history rewrites become a problem.
Revert is the only safe way to undo commits on shared branches like main, develop, or release.
Revert as a Deployment Rollback
The 2024 DORA report, drawing from over 39,000 professionals, defines change failure rate as the percentage of deployments requiring a rollback or hotfix. Elite teams keep that number under 5%.
When a bad deployment hits production, the fastest response is often a git revert on the offending commit followed by a push. The build pipeline picks it up, runs the tests, and deploys the reverted state.
Jaguar Land Rover reportedly cut feedback cycles by 99% and ran up to 70 daily deploys after moving to GitLab’s unified DevOps environment, according to Mordor Intelligence. At that kind of deployment frequency, a clean revert mechanism is not optional.
Platform Revert Buttons
GitHub, GitLab, and Bitbucket all surface a “Revert” button on merged pull requests. Each platform handles it slightly differently.
| Platform | Revert Button | Works With |
|---|---|---|
| GitHub | Yes, on merged PRs | Squash, rebase, merge commit |
| GitLab | Yes, on merged MRs | Merge commit only |
| Bitbucket | Yes, on merged PRs | Merge commit |
Under the hood, these buttons run git revert -m 1 and open a new pull request with the result. Clicking "Revert" on GitHub creates a new branch, applies the revert, and generates a PR you can review before merging.
Communication Practices
Reverting without telling your team is asking for confusion. Link the revert commit to the original issue in your tracker. Reference the pull request number in the revert message.
Something like: Revert “Add payment validation (#412)” – causes timeout on checkout flow, see JIRA-789
With GitHub Actions consuming 11.5 billion minutes during 2024-2025 (a 35% year-over-year increase, per Mordor Intelligence), automated pipelines trigger on every commit. A revert without context means your teammates see a deploy they didn’t expect and have to dig through logs to figure out what happened.
Common Git Revert Mistakes
Most revert mistakes come from misunderstanding what the command actually does. Here are the ones that catch people repeatedly.
Forgetting the -m Flag on Merge Commits
You run git revert on a merge commit. Git throws an error about missing the -m option. The error message is actually pretty clear, but it still trips up developers who don't realize they're targeting a merge commit in the first place.
Fix: always check the commit type with git log –oneline before reverting. Merge commits typically say "Merge branch..." or "Merge pull request..." in the message.
Reverting the Wrong Commit
SHA hashes look alike when you’re scanning a long git log. One character off and you’ve reverted the wrong change.
Prevention: Use git log –oneline –graph to visualize the commit tree. Double check the hash. And use git diff to preview what the revert will actually change before you run it.
Expecting “Undo All” Behavior
Git revert targets a specific commit, not everything after it. If commit A, B, and C were made and you revert B, commits A and C remain untouched.
Developers coming from tools with a linear undo history (think Ctrl+Z) often expect revert to roll back everything from a certain point forward. That’s not how it works. For that behavior, you’d need to revert a range or use reset (locally).
The Revert-of-a-Revert Trap
Reverting a revert re-applies the original changes. This is intentional behavior, but it surprises people who see a “Revert” commit and decide to undo that too.
Tower Blog points out that combining unrelated changes into single commits makes reverting problematic, since undoing one change means undoing everything in that commit. Keeping commits small and focused makes reverts surgical instead of messy.
Pushing a Revert Without Team Communication
A revert on a shared branch triggers the CI/CD pipeline, changes what’s deployed, and shows up in everyone’s git pull. Pushing one silently, especially on a production branch, causes confusion.
Always ping the team. Always reference the issue ticket. The change management process matters more when you’re removing code than when you’re adding it.
Git Revert Command Reference
Quick reference for every flag and syntax variation you’ll actually use.
Basic Syntax
| Command | What It Does |
|---|---|
git revert | Reverts a single commit, opens editor for message |
git revert --no-edit | Reverts without opening the commit message editor |
git revert --no-commit | Stages inverse changes without auto-committing |
git revert -m 1 | Reverts a merge commit using parent 1 as mainline |
Conflict Resolution Flags
–continue: After resolving conflicts manually, this resumes the revert process and creates the commit.
–abort: Cancels the revert entirely and restores the repository to its pre-revert state. Use this when things go sideways.
–skip: When reverting a range, skips the current commit (the one causing the conflict) and moves to the next one in the sequence.
Range Syntax
Reverting multiple commits uses Git’s revision range notation. The caret matters.
- git revert A^..B
reverts all commits from A through B (inclusive)
- git revert A..B
reverts commits after A up to and including B
- Adding -n
to any range command batches all inverse changes into a single staged result
The full list of Git commands covers the broader toolkit, but for undoing work on shared branches, git revert with these flags handles the vast majority of scenarios. Pair it with git status to track where things stand mid-revert, and git log to verify the result after.
FAQ on What Is Git Revert
Does git revert delete the original commit?
No. Git revert creates a new commit that applies the inverse of the target commit’s changes. The original commit stays in the history. Nothing gets erased or rewritten, which is why revert is safe for shared branches.
What is the difference between git revert and git reset?
Git revert adds a new commit to undo changes while preserving history. Git rebase and reset both alter the commit graph. Reset moves the branch pointer backward and can erase commits, making it risky on shared branches.
Can you revert a merge commit in Git?
Yes, but you need the -m flag. Merge commits have two parents, so Git needs you to specify which parent to revert to. The syntax is git revert -m 1 , where 1 usually means the mainline branch.
What happens if git revert causes a conflict?
Git pauses the revert and marks conflicted files. You resolve the conflicts manually, stage the files with git add, then run git revert –continue. If you want to cancel entirely, use git revert –abort.
Can you revert multiple commits at once?
Yes. Use the range syntax: git revert ^... Adding the --no-commit flag batches all inverse changes into your working directory so you can wrap them into a single commit instead of one per revert.
Does git revert affect the remote repository?
Not automatically. The revert commit exists locally until you push it. Once you push the revert, it reaches the remote and other developers will pull the reverted state on their next fetch.
How do you undo a git revert?
Revert the revert. Run git revert on the commit that performed the original undo. This re-applies the changes that were reversed. It sounds circular, but it's the standard approach in Git workflows.
Is git revert safe to use on the main branch?
Yes. That’s its primary use case. Because revert adds a new commit instead of rewriting history, it won’t break other developers’ local copies. It’s the recommended way to revert a commit on any branch others depend on.
What does the –no-commit flag do in git revert?
It stages the inverse changes without creating a commit automatically. This lets you inspect the result, combine multiple reverts, or make additional edits before committing. Think of it as a preview mode for your revert operation.
Can git revert be used in CI/CD pipelines?
Absolutely. Teams use git revert as a fast rollback in deployment pipelines. A revert commit triggers the build pipeline just like any other commit, redeploying the previous working state without manual intervention or history rewrites.
Conclusion
Understanding what is git revert comes down to one idea: undo changes without destroying history. It’s the command built for collaboration, for shared branches, for teams that can’t afford to rewrite what’s already been pushed.
Whether you’re rolling back a single broken commit or reversing an entire merge on your production branch, revert keeps the source control timeline clean. Your teammates see exactly what happened and why.
Get comfortable with the -m flag for merge reverts. Learn the –no-commit` option for batching. Know the difference between revert, reset, and git stash.
These aren’t edge cases. With distributed version control powering nearly every software development process today, knowing how to safely undo work is as fundamental as knowing how to commit it in the first place.
Many of his resources are available on various design marketplaces and for free on Codepen.
Over the years, he's worked with a range of clients and contributed to design publications like Design Your Way, Designmodo, WebDesignerDepot, WPDean, Speckyboy, and Slider Revolution among others.
- How to Make a Repository Public in GitHub - July 14, 2026
- Production Incident Communication Without Separate Monitoring and Status-Page Systems - July 13, 2026
- How to Set Up Subscriptions on Google Play (Developer Guide) - July 12, 2026


