Building games with Python starts with one step: learning how to install Pygame in PyCharm.
Pygame is the go-to library for 2D game development. It handles graphics, sound, and user input through SDL bindings. But getting it running inside JetBrains’ IDE trips up many beginners.
Wrong interpreter settings. Failed pip commands. Module not found errors.
This guide walks you through the complete installation process in under 3 minutes. You’ll configure your Python interpreter, add Pygame through the package manager, and verify everything works.
By the end, you’ll have a working Pygame setup ready for your first game project.
Introduction
Installing Pygame in PyCharm is the process of adding Python’s game development library to your project using the IDE’s built-in package manager.
You need this when building 2D games, multimedia applications, or interactive graphics projects.
This guide covers 5 steps requiring about 3 minutes and basic familiarity with PyCharm.
Prerequisites
Before you start, make sure you have the following ready:
- PyCharm Community Edition or Professional (version 2020.1 or later)
- Python 3.7 or higher installed on your system
- Active internet connection for downloading from PyPI
- An existing project or willingness to create a new project in PyCharm
Time estimate: 2-3 minutes.
Skill level: Beginner.
Step One: How Do You Open the PyCharm Settings Menu?
Access PyCharm settings through the main menu or keyboard shortcut to reach the package installation interface where you can manage Python modules and external libraries.
Action
Windows/Linux: File > Settings or press Ctrl+Alt+S
macOS: PyCharm > Preferences or press Cmd+,
The Settings dialog opens with a searchable list of configuration categories on the left panel.
Purpose
The Settings menu provides access to Python interpreter configuration and package management tools required for library installation.
Step Two: How Do You Access the Python Interpreter Settings?
Navigate to Project > Python Interpreter within the Settings dialog to view installed packages and access the pip install interface for adding new dependencies.
Action
- In the left sidebar: Project: [YourProjectName] > Python Interpreter
- View the list of currently installed packages in your virtual environment
- Confirm your Python version displays correctly (Python 3.7+)
Purpose
The Python Interpreter panel shows all modules in your project’s environment.
If you need to change your Python version, do it here before installing Pygame.
Step Three: How Do You Add a New Package in PyCharm?
Click the + icon in the Python Interpreter panel to open PyCharm’s package manager interface, which connects directly to the Python Package Index for downloading libraries.
Action
- Click the + button (located below the package list)
- The “Available Packages” dialog appears with a search field at the top
- Wait for the package index to load from PyPI
Purpose
This interface lets you install packages in PyCharm without touching the terminal.
JetBrains designed it to handle dependency management automatically.
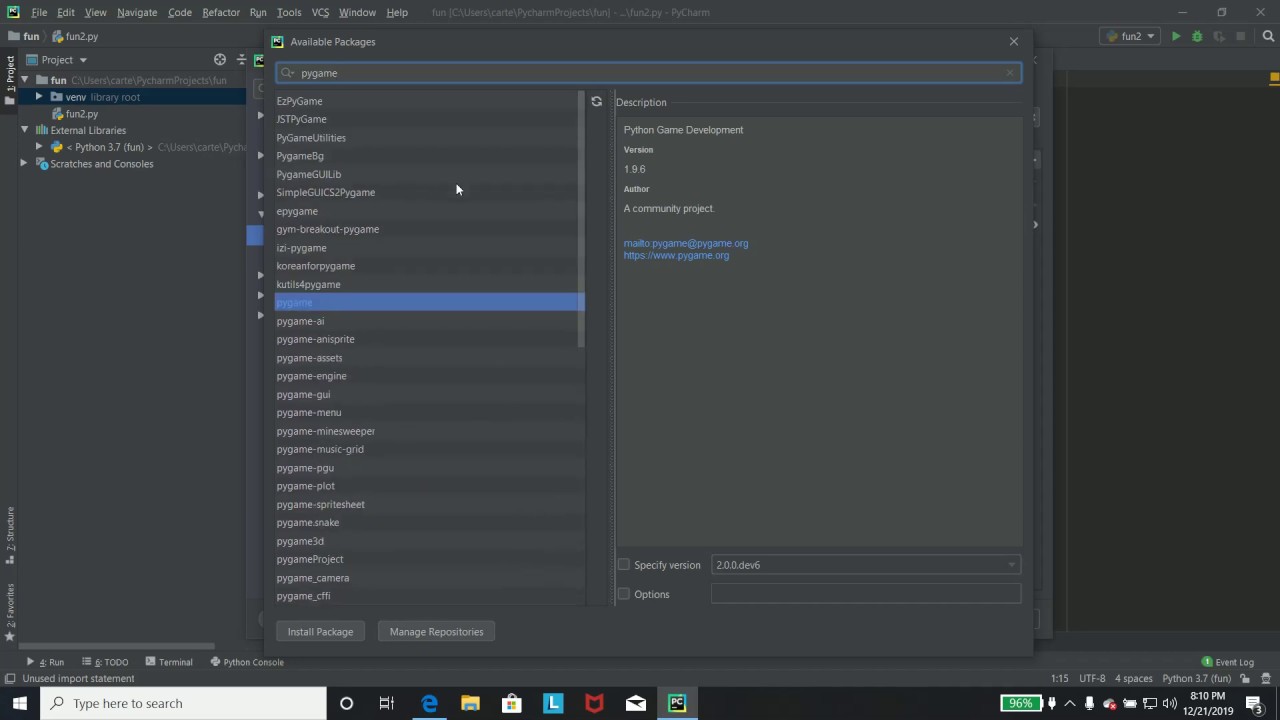
Step Four: How Do You Search and Select Pygame?
Type “pygame” in the search field to locate the official game development library maintained by the Python Software Foundation and SDL community.
Action
- Type pygame in the search box at the top
- Wait 2-3 seconds for results to populate
- Select “pygame” from the list (not pygame-sdl2 or other variants)
- Check “Specify version” if you need a specific release
Purpose
Multiple packages contain “pygame” in the name. Selecting the correct one prevents compatibility issues with SDL bindings.
Step Five: How Do You Complete the Pygame Installation?
Click Install Package to download Pygame and its dependencies from PyPI, then verify the installation succeeded through the confirmation message.
Action
- Click the Install Package button at the bottom
- Watch the progress bar; pip downloads approximately 10-12 MB
- Wait for “Package ‘pygame’ installed successfully” message
- Close the Available Packages dialog
Purpose
PyCharm handles dependency resolution automatically. The IDE downloads SDL libraries bundled with Pygame for Windows, macOS, and Linux.
Verification
Confirm your installation works by running a simple import test in PyCharm’s console.
Create a new Python file or use the Python Console (View > Tool Windows > Python Console).
Enter this code:
“ import pygame pygame.init() print(pygame.ver) `
Expected output: version number like “2.5.2” with no errors.
If the import succeeds, you can run code in PyCharm to build your first game window.
Troubleshooting
Issue: Pygame Installation Fails with Pip Error
Solution: Update pip first. Open PyCharm terminal (View > Tool Windows > Terminal) and run:
` python -m pip install --upgrade pip `
Then retry the installation through the package manager.
Issue: Module Not Found After Installation
Solution: Your project uses a different interpreter than the one where Pygame installed.
Go to Settings > Project > Python Interpreter and confirm the correct virtual environment is selected.
Issue: Version Compatibility Problems
Solution: Pygame 2.x requires Python 3.6+. Check your Python version matches.
For Python 2.7 projects (not recommended), install pygame version 1.9.6 specifically.
Alternative Method: Terminal Installation in PyCharm
Use PyCharm’s integrated terminal for direct pip commands when the GUI package manager fails or when you prefer command-line workflows.
Comparison
- GUI Method: 5 clicks, visual feedback, automatic dependency handling
- Terminal Method: 1 command, faster for experienced developers, better error messages
Terminal Steps
- Open Terminal: View > Tool Windows > Terminal
- Run: pip install pygame
- Wait for installation to complete
Choose terminal when GUI shows “package not found” errors or when working with pip configuration issues.
Related Processes
After installing Pygame, consider these next steps for your game development workflow:
- Install NumPy for mathematical operations in physics simulations
- Debug your code using PyCharm’s breakpoint system
- Install additional libraries like Pillow for image processing
- Connect PyCharm to GitHub for version control
Many applications built with Python started as simple Pygame projects before growing into full productions.
FAQ on How To Install Pygame In PyCharm
Why Won’t Pygame Install in PyCharm?
Common causes include outdated pip, incorrect Python interpreter selection, or network issues blocking PyPI access. Update pip first using the terminal command python -m pip install –upgrade pip, then retry through the package manager.
How Do I Check if Pygame Is Installed Correctly?
Open PyCharm’s Python Console and type import pygame followed by print(pygame.ver). A version number confirms successful installation. Any ImportError means the module isn't in your current interpreter's environment.
What Python Version Does Pygame Require?
Pygame 2.x requires Python 3.6 or higher. Python 3.10 and 3.11 work best with current releases. Check compatibility on the official Pygame documentation before installing if you’re using older Python versions.
Can I Install Pygame Without Using Pip?
Yes. Download the wheel file (.whl) from PyPI manually, then install via PyCharm’s package manager using “Install from disk” option. Conda users can run conda install -c cogsci pygame in Anaconda environments instead.
Why Does PyCharm Say “No Module Named Pygame”?
Your script runs under a different interpreter than where Pygame installed. Verify the correct virtual environment is selected in Settings > Project > Python Interpreter. Each project can have separate package installations.
How Do I Install a Specific Version of Pygame?
In the Available Packages dialog, check “Specify version” before clicking Install. Select your target version from the dropdown. Terminal alternative: pip install pygame==2.5.0 for exact version control.
Does Pygame Work With PyCharm Community Edition?
Absolutely. PyCharm Community Edition includes full package management capabilities. The installation process is identical to Professional. JetBrains didn’t restrict library installation features in the free version.
How Do I Update Pygame to the Latest Version?
Select pygame in the Python Interpreter package list, then click the upgrade arrow icon. Terminal method: pip install –upgrade pygame. Always keep PyCharm updated for best compatibility with newer packages.
Can I Install Pygame in a Virtual Environment?
Yes, and you should. Virtual environments isolate project dependencies. PyCharm creates one automatically for new projects. Pygame installs into whichever environment your project interpreter points to in settings.
Why Is Pygame Installation Taking So Long?
Pygame downloads SDL libraries bundled in the package, roughly 10-12 MB total. Slow connections or PyPI server load cause delays. Corporate firewalls may also throttle package index downloads significantly.
Conclusion
You now know how to install Pygame in PyCharm using the built-in package manager. The process takes less than 3 minutes.
Configure your Python environment correctly first. Select the right interpreter, click the + icon, search for pygame, and install. Done.
Troubleshooting usually comes down to virtual environment mismatches or outdated pip versions. Both fixes take seconds.
The terminal method works as a backup when the GUI fails. Run pip install pygame` and move on.
Your game development setup is ready. Start with a simple display window, add sprites, then build from there.
Pygame handles rendering, audio, and input events. PyCharm handles everything else: code commenting, debugging, and project organization.
Now build something.
Many of his resources are available on various design marketplaces and for free on Codepen.
Over the years, he's worked with a range of clients and contributed to design publications like Design Your Way, Designmodo, WebDesignerDepot, WPDean, Speckyboy, and Slider Revolution among others.
- How to Run Pytest in PyCharm: A Complete Walkthrough - July 16, 2026
- How to Make a Repository Public in GitHub - July 14, 2026
- Production Incident Communication Without Separate Monitoring and Status-Page Systems - July 13, 2026