

Betting on the success of your latest Android app? Imagine unveiling your app to eager users before the official launch. This is where beta testing on the Google Play Store comes into play.
You’ve perfected the code, polished the interface, and now, it’s time to venture into the real world of pre-release feedback.
Every seasoned app developer knows the value of a seamless beta testing phase. It’s not just about identifying bugs but also fine-tuning user experience and ensuring compliance with Google Play policies.
Whether you’re gearing up for internal testing, closed testing, or open beta testing, understanding the Google Play Console intricacies is your ticket to success.
In this guide, you’ll learn how to submit an app to the Google Play store for beta testing, diving into the setup of your Google Developer Account, configuring beta release settings, and leveraging essential tools like Play Store’s feedback collection.
Preparing for Beta Testing
Setting Up Your Developer Environment
Creating a Google Developer Account

Let’s dive right into the nucleus. A Google Developer Account is your golden ticket to the Play Store universe. First, navigate to the Google Play Console.
You’ll need a Google account, preferably a sleek one you use for professional ventures. Select “Get Started” and be prepared to part with $25. It’s a one-time fee, a small price for unlocking doors to millions of Android devices.
Follow the prompts like assembling a Lego set but with more clicking. Provide accurate details—your name, company (if applicable), and contact info. Double-check; you don’t want a typo haunting you later.
Adding a Merchant Account for Paid Apps
Thinking of monetizing? A merchant account is compulsory if you plan to charge for your app. In the Play Console, head to the financial section.
Click on ‘Set up a merchant account.’ This is where it gets financial. Provide your business details, legal name, and banking information.
Everything here needs to be crisp and precise. Inaccuracies can lead to payment issues. Ensure your bank details are correct to avoid those nightmare scenarios where your earnings vanish into the ether.
Compliance with Google Developer Policies
Understanding Google Developer Policies
Picture this: you’ve set up your developer environment, and your coding is as sleek as Tesla’s. But hold your horses. Compliance with Google Developer Policies is non-negotiable. Dive into the Google Play Developer Policies. It’s a labyrinth, but navigating it ensures your app won’t be exiled into the abyss.
Read the policies as if they’re the sacred scripts, especially sections on prohibited content, ads, and user data. This isn’t just about avoiding a slap on the wrist—it’s about safeguarding your app’s future.
Key Policies to Consider
You need to zero in on some key policies. Privacy is pivotal. Your app must have a Privacy Policy, and it should be transparent and accessible. No cloaking in legal jargon—users should breathe easy knowing their data isn’t being unceremoniously shipped to third parties.
Preparing Your App for Beta Testing
Technical Preparations
Ensuring App Stability and Functionality
A fortress starts with a solid foundation. Same goes for your app. Stability and functionality aren’t just checkboxes; they’re lifeblood. Dive into rigorous quality assurance.
Crash-free? Smooth UI? Run your app under a microscope. Automated testing tools like Espresso and Robolectric should become your best friends here.
Consider the user flow—you want it buttery smooth. Fix those sneaky bugs that lurk in the dark corners. A seamless experience isn’t a luxury; it’s mandatory. Your beta testers should glide through, not stumble over digital landmines.
Unique Bundle ID and App Size Requirements
Bundle IDs are like your app’s DNA—unique and unchangeable once set. Think of it as your app’s social security number. Keep it memorable yet professional.
Then there’s app size. Smaller isn’t just better; it’s essential. Optimize your APK or AAB size. Convert hefty images and video clips into lean, mean, streamlined assets. Every kilobyte counts. Users dislike bloated apps hogging their storage.
File Formats: APK vs. AAB
The age-old duel: APK vs. AAB. APKs are the veterans, reliable and straightforward, but AABs? The future. AABs ( Android App Bundles ) offer dynamic delivery, slicing and dicing your app for specific devices.
It’s like a tailored suit vs. an off-the-rack jacket. AABs optimize installation, reducing unnecessary bloat. But remember, Google Play mandates AABs now. Embrace the future—your users will thank you.
Document Preparation
End User License Agreement (EULA)
Straightforward yet critical, the End User License Agreement lays down the law. It’s the contract between you and the users, specifying what they can—and cannot—do with your app. Keep it clear. Avoid legalese.
Your EULA should protect your intellectual property while clarifying usage rights. Work with legal experts, unless you moonlight as a lawyer. This document is non-negotiable.
Privacy Policy and Terms of Use
Two bulldogs guarding the gate. Privacy Policy and Terms of Use. In the digital realm of privacy concerns, transparency is your shield. Detail what user data you collect, how you use it, and whom you might share it with—no hiding.
Terms of Use keep you in the user’s good books. Dictate the dos and don’ts. Lay out the ground rules. Keep it user-friendly. After all, users prefer knowing what they’re stepping into.
Setting Up the Beta Test
Choosing the Right Testing Track
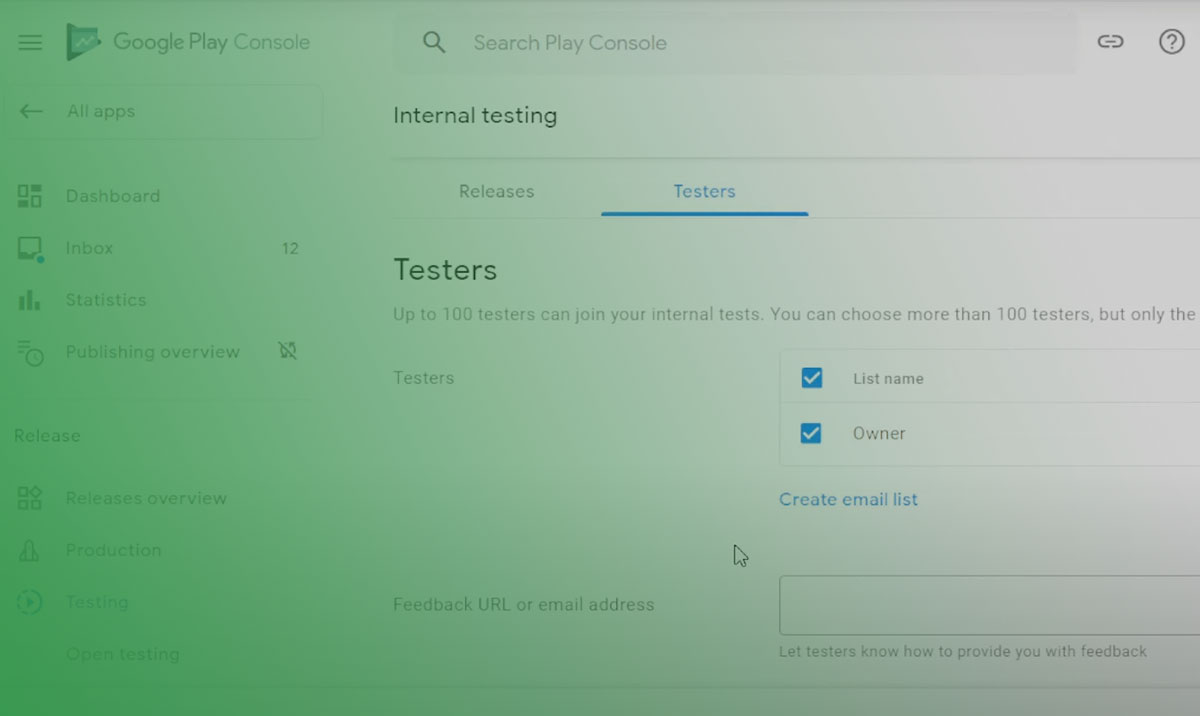
Internal Testing

Alright, let’s start small. Internal testing—your inner circle. Think close-knit team, colleagues, maybe a few trusted pals. You want immediate feedback, quick iterations. Here, you’re ironing out those last-minute kinks no one should have to deal with later.
How do you do it? Go to the Google Play Console, select your app, and invite up to 100 testers. Keep it secret, keep it safe. Quick feedback loops are your Utopia.
Closed Testing
Next level. Closed testing. Wider net, more diverse feedback. Now, you’re reaching out to a specific group—loyal users, niche communities, maybe some influencers. Your goal? Diverse devices, varied user habits.
Here’s the kicker: you can create multiple tracks, one for each community. Family, external testers, special groups—you name it. Go wild; the insights you gain here are solid gold.
Open Testing
All in. Open testing—public access but still beta. The masses. You’re now casting a net into the ocean. Perfect for those needing massive data sets, real-world environments.
Anyone can see it, anyone can join. But handle this stage with care. Public perception can be swayed by even the tiniest bug. Transparency is your ally, communicate clearly that it’s beta—the masses aren’t always forgiving.
Configuring Beta Release Settings
Setting Up the App on Google Console
Dive into the Google Console, it’s your playground. Set up your app, upload the APK or AAB. Fill in all necessary details—version name, code, specs. Google’s guiding you through it, like GPS for apps.
This part? Precision is key. Descriptions must be spot-on, visuals sharp, metadata complete. You’re not just dropping files; you’re sculpting a digital masterpiece.
Crafting an Effective Beta Listing
Ah, the beta listing. This is where art meets science. An effective beta listing is compelling, clear, and informative all at once. Think marketing copy meets tech documentation. You want to grab attention but also inform.
Highlight key features, articulate what testers should focus on. Specify what kind of feedback you’re craving. Use eye-catching visuals—aesthetic counts. Ensure your listing isn’t just informative but alluring. User experience here can tantalize or terminate potential interest.
Executing the Beta Test
Distributing the Beta Version
Using Google Play Console for Distribution
Now, the moment of truth. You’ve tweaked, adjusted, and perfected. Open up the Google Play Console. Navigate through the labyrinth, following the breadcrumbs until you find the beta release section. Here, upload that polished jewel of an APK or AAB.
The distribution process? Streamlined but make no mistake—double-check every detail, every checkbox. Missteps here are unforgiving.
A few clicks and voila, your app is live in beta.
Sharing the App with Testers
But how do you get those eager testers onboard? Share, share, share. Use the unique link provided by Google Play Console. Email it, blast it on social media, or drop it in niche forums.
Don’t just share though—create a compelling message. Highlight why they should care. The draw is in the exclusivity, they’re a vital part of your app’s journey. Make them feel like insiders on a mission.
Monitoring Tester Engagement
Collecting and Analyzing Feedback
Launch day is adrenaline-fueled, but the real work begins now. Engage with your testers early and often. Use Google Play’s in-built feedback collection tools. Encourage detailed reports on bugs, performance issues, UI quirks—anything and everything.
Don’t drown in data. Organize, analyze. Convert raw feedback into actionable insights. This is where tools like spreadsheets become invaluable. Sentiment analysis helps gauge overall reception, giving you the pulse of your user base.
Using Automated Tools for Bug Reporting

Automate the mundane, focus on the critical. Automated bug reporting tools like Firebase Crashlytics and Bugfender free you from sorting through endless error logs.
They pinpoint where the code rebels, showing crash reports and user journeys.
These tools are your radar, sonar, and old-school compass rolled into one. They guide you through your bug-fixing voyage. Efficiency isn’t a luxury here—it’s survival.
Ensuring Test Coverage and Security
Test Coverage Strategies
A sprawling landscape needs thorough exploration. Same with your app. Diversify your testing environments—different devices, OS versions, screen sizes.
Each represents a unique scenario. Use cloud-based test labs like Google’s Firebase Test Lab to run tests across a multitude of devices.
Aim for maximum coverage, leaving no nook or cranny unexamined. Test cases should be comprehensive, from sign-up flows to obscure settings buried three menus deep.
Addressing Security Concerns
Trust is fragile. One breach, and it shatters.
Your beta phase is a prime time to reinforce security. Penetration testing tools like OWASP ZAP can be used to identify vulnerabilities. They simulate attacks to expose weak spots.
Data encryption is a must. Secure those connections with SSL/TLS, fortify your back-end. Remember, your app isn’t just code—it’s a vault of user data. Treat it with the reverence it deserves.
Collecting and Analyzing Feedback
Effective Feedback Collection Methods
Bug Reporting Tools
Imagine the symphony of ones and zeroes you’re fine-tuning. But to catch the dissonance, you need tools like Bugfender, Firebase Crashlytics, and Sentry. They become the maestro detecting those off-notes, those lurking bugs.
Use them to track crashes, gather logs, and pinpoint the lines of code causing havoc. Automate it. Email notifications—real-time alerts. Every bug report is a clue, leading you to serenity in the code.
Final Feedback Surveys
Once the dust settles from initial bug fixes, it’s time to survey your troops. Send out final feedback surveys. Use Google Forms, SurveyMonkey, or Typeform.
Focus on specifics:
- UI/UX experience
- Feature usability
- Overall satisfaction.
Keep it concise but comprehensive. Testers are your battleground sensors. Their insights shape the aftermath of your digital war.
Analyzing Feedback
Sentiment Analysis
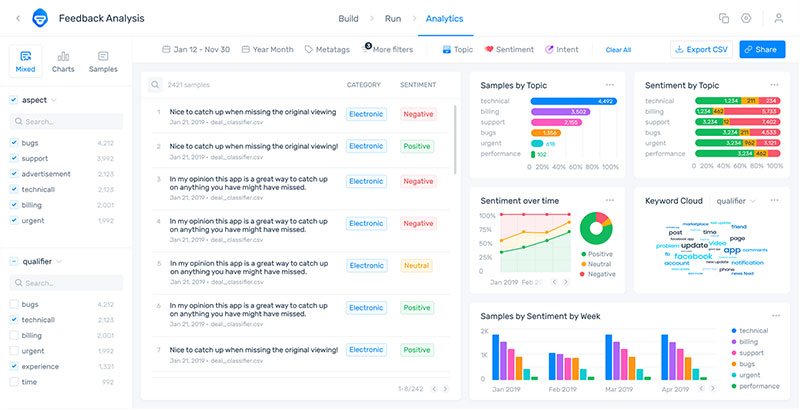

Raw data is chaos; sentiment analysis is your order. Tools like MonkeyLearn and Lexalytics turn free-form text into structured insights.
Run the comments through these engines. Extract emotions—are users frustrated? Thrilled? Confused? Get to the pulse of your user base.
Transform feedback into a heatmap of sentiment, guiding where the next patch notes should focus.
Prioritizing Feedback for Iteration
Now, strategize. Prioritize feedback. Use a matrix—Impact vs. Effort. High-impact, low-effort fixes shoot to the top. Bigger projects get scheduled, but you address the low-hanging fruit first.
Critical issues—security breaches, major crashes—these leapfrog everything. Usability tweaks and feature enhancements come next. Be methodical.
This phase isn’t just about refining. It’s about tactical iteration. Each cycle brings you closer to that shiny app nirvana—where user love meets flawless functionality.
Iterating Based on Feedback
Fixing Bugs and Enhancing Features
Addressing Major Bugs
The bug circus begins. Alright, triage time. Those major bugs—think of them as glaring neon signs. They scream for attention. Your app’s integrity rests on squashing these first.
Use Bugfender or Crashlytics to trace the crash reports. Dig into the stack traces. Each fix is a battle won. Code it out, test rigorously, and patch those life-threatening vulnerabilities.
Remember, these are the landmines; step lightly but decisively.
Enhancing User Experience Based on Feedback
Then there’s the finesse, the polish. User feedback often uncovers those little snags in the user experience. Enhancing UX isn’t about slapping on new paint; it’s about sanding down the rough edges.
Streamline those clunky interfaces. Improve the UI flow. Make navigation intuitive. Little tweaks can lead to monumental satisfaction.
Incorporate user suggestions where feasible—pinch-to-zoom, dark mode, one-touch payments. These aren’t just features but love letters to your users.
Continuous Engagement with Testers
Providing Updates and Communicating Changes
Keep your testers in the loop. Updates aren’t just releases; they’re conversations. Regularly push updates addressing the issues they’ve reported. Use the release notes to articulate every change, every fix. Transparency is your ally.
Send emails, create a Changelog blog, use in-app notifications. Each update is a step closer to perfection, and testers need to feel that momentum.
Encouraging Ongoing Feedback
Feedback isn’t a one-off event; it’s continuous engagement. Keep those lines open. In-app feedback buttons, community forums, social media—all are your touchpoints.
Encourage testers to be candid. Offer incentives for detailed feedback—early access, exclusive features, shout-outs. Make them feel valued.
Iteration is endless. It’s a cycle, a loop of perpetual improvement. Engage, iterate, repeat.
Transitioning from Beta to Production
Finalizing App Features
Decision Making for Feature Inclusion
Here we are, standing at the crossroads of vision and reality. Each feature gleams with potential, but only the chosen ones make the cut. Take the feedback, the data—each user comment is a whisper guiding you.
Which features spark joy? Which add value? Use a matrix of necessity vs. innovation. Some features may be alluring yet impractical, others indispensable. It’s like curating a playlist; every track must resonate.
Internal Retrospectives and Reviews
Zoom in with internal retrospectives. Gather the team, circle the wagons. Reflect on the journey. What worked? What tripped you up? Capture insights, not just metrics.
Hold honest reviews. This isn’t about placing blame—it’s autopsy and analysis. Why did that crash happen? How did that feature delight users? Document these lessons, they’re your compass for future expeditions.
Preparing for Scale
Load Testing and Performance Monitoring
Breathe deeply; the next leap is scale. Your app isn’t just about surviving—it’s about thriving in the wild. Enter load testing. Push your app to its limits. Simulate traffic storms. Identify choke points.
Tools like Apache JMeter and BlazeMeter are your battlegrounds. Measure response times, monitor stress. Every lag, every crash under load? That’s data, precious data.
Implementing Scaling Strategies
Defense is ready. Now, offense—implement scaling strategies. Think horizontal scaling with cloud services like Google Cloud Platform. Microservices, distributed databases, CDN for static assets.
It’s architecture—building skyscrapers, not single-story shacks. Ensure seamless performance even when the user base explodes from 100 to 10,000 overnight.
Launching on Google Play Store
Submitting Final Release Candidate Builds
The final hurdle. Your app stands tall, battle-tested and refined. Head to the Google Play Console. Upload the final release candidate builds. Verify, certify. Fill in every detail meticulously—this is the final boarding call.
Hit submit. The process has been grueling, but it’s the culmination of every line of code, every feedback form.
This is how to submit an app to the Google Play store for beta testing and beyond.
Managing Post-Launch Activities
The launch isn’t the end, it’s the beginning of a new phase. Keep tabs on initial feedback. Monitor Google Play metrics—downloads, crash reports, user reviews.
Post-launch activities are your lifeline. Regular updates, patches, new features. Engage users, listen, iterate. This ecosystem is dynamic. The post-launch phase is a dance, not a setpiece.
FAQ On How To Submit An App To The Google Play Store For Beta Testing
What is a Google Developer Account, and why do I need it?
A Google Developer Account is essential. It’s your gateway to managing and submitting your app on the Google Play Store. From setting up internal testing to closed beta testing, the console offers the tools to distribute and gather user feedback seamlessly.
Start by creating an account and configuring your Google Play Console.
How do I prepare my app for beta testing?
Preparation is key. Ensure your app is stable and functional. Get your APK or AAB format files ready. Follow Google’s vendor guidelines while aligning with their privacy policy and End User License Agreement. Make sure to include every testing phase in your beta testing workflow.
What are the steps to set up beta testing on Google Play Console?
First, sign in to Google Play Console. Navigate to your app and select Release Management. Choose between internal, closed, or open testing tracks.
Configure the beta release settings and prepare an engaging beta listing. You’re now ready to invite testers and distribute your app.
How do I invite testers to my beta testing?
Open Google Play Console. For closed testing, add specific email addresses. For open testing, provide a public link for users to join.
Regardless of the method, ensure you have a strategy to recruit valuable beta tester feedback. Initiate distribution through your selected tracks.
What should I include in my beta app listing?
Craft a compelling beta app listing. Highlight key features you want testers to focus on. Ensure clarity about the app’s purpose, its unique bundle ID, and any potential issues.
Encourage honest feedback by implementing effective feedback collection tools and maintaining transparency with testers.
How do I collect and analyze beta tester feedback?
Feedback is gold. During the beta phase, monitor user reviews and bug reports actively. Utilize automated bug reporting tools to streamline data collection. Dive into sentiment analysis to grasp user satisfaction, prioritizing the feedback for iteration. This is crucial for your app’s success.
How do I ensure security during beta testing?
Prioritize security. Limit access to your beta app version during testing. Ensure any data collected is secure and complies with Google’s privacy policy.
Implement test coverage strategies that take into consideration all security concerns, ensuring your app remains robust and secure.
What common issues arise during beta testing?
Beta testing can unearth several issues—compatibility bugs, performance lag, and UI inconsistencies. Prepare for a rigorous feedback cycle. Engage testers actively in providing detailed reports.
Addressing these hurdles early using Google Play services and crashlytics integration makes the final product better.
When should I transition from beta to production?
Timing is crucial. Once you’ve iterated and refined features based on detailed feedback, it’s time to scale. Conduct load testing and performance monitoring.
Finalize app features, ensuring they meet all Google Play policies, then proceed by submitting your final release candidate build.
What post-beta steps should I take before launch?
Post-beta, finalize all app features and address major bugs identified during testing. Retrospectively review internal processes to improve future launches. Prepare your scaling strategy.
Finally, manage post-launch activities with focus on continuous engagement and updates based on user feedback from the Google Play Store.
Conclusion
Submitting an app to the Google Play store for beta testing might seem like a labyrinth, but it’s an essential step before unveiling your app to the world. Understanding the nuances of the Google Play Console, preparing your app meticulously, and engaging diligently with testers are fundamental.
From setting up a Google Developer Account, configuring internal, closed, or open testing tracks, to distributing your APK or AAB and gathering feedback, the process demands precision. Your beta app listing should captivate and inform, encouraging detailed feedback.
Emphasize security and comprehensive test coverage strategies, ensuring compliance with Google’s policies. Use the feedback loop to refine, prioritizing bug fixes and enhancing user experience.
When transitioning from beta to production, tackle load testing, finalize features, and adhere to performance monitoring. Preparing for launch includes managing post-launch activities, with insights gathered ensuring a robust go-live strategy. Master these steps, and you’ll command the beta testing phase, paving the way for a successful market entry on the Google Play Store.
If you liked this article about how to submit an app to the Google Play store for beta testing, you should check out this article about how to change the country in the Google Play store.
There are also similar articles discussing How to get a refund from the Google Play Store, how to set Google Play parental control, how to cancel a subscription on Google Play, and how to add or remove payment methods in Google Play.
And let’s not forget about articles on Google Play stuck on pending, Google Play store not working, Google Play age ratings, and Google Play store ranking algorithm.

