


Navigating the digital landscape of Google’s ecosystem can be intricate, especially when it comes to managing your financial interactions.
Whether you’re trying to add or remove payment methods in Google Play, it’s essential to get it right to avoid any disruptions in your purchases or subscriptions.
Picture this: You’ve found an incredible app or a must-watch movie on the Google Play Store, but you’re halted by outdated payment information.
Frustrating, right? Understanding the nuances of managing your Google Play payment options is not just about convenience—it’s about ensuring seamless access to all the services you value.
In this guide, you’ll discover how to effortlessly update, manage, and troubleshoot your payment methods on both Android devices and through your web browser.
We’ll dive deep into topics like setting up with PayPal, utilizing Google Play Gift Cards, and handling subscription renewals. By the end, you’ll be equipped to navigate the Google Play Store like a pro.
Adding a Payment Method to Google Play
On Android Devices
Opening the Google Play Store App
So you’ve got your Android device in hand. First step? Open Google Play Store App.
That vibrant triangle icon feels like it’s about to take you on a colorful journey through endless apps.
Navigating to Payment Methods
Once you’re in, tap on that hamburger menu. You know, those three lines in the upper-left corner? Scroll down a bit and you’ll find Payment Methods nestled comfortably in the list.
It’s like the heart of your Google Play billing adventure.
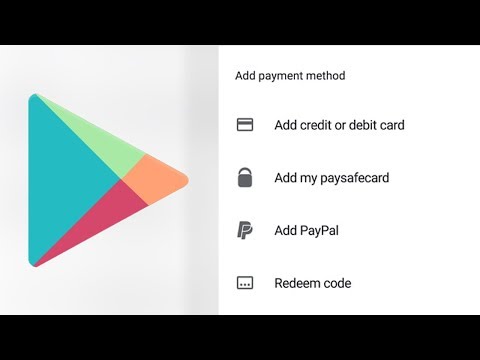
Selecting and Adding a Preferred Payment Method
Ready for some action? Select Add Payment Method. Maybe it’s a credit card or even a debit card. Perhaps you’re eyeing that PayPal option?
Make sure you’re choosing what suits your digital wallet best.
Following On-Screen Instructions
Screens will start guiding you with carefully crafted steps. Follow them. Input those digits, confirm those details.
It’s like following a treasure map, but the destination is seamless app purchases and game boosts.
On a Computer or Web Browser
Accessing Google Play via Web Browser
Okay, now let’s switch gears. Fire up your computer or web browser. Head over to Google Play’s website.
Easy peasy, right?
Signing in to Google Account
You’ll need to sign in to your Google Account. Make sure it’s the same one linked to your device.
You don’t want to end up adding a payment method to some other account, do you?
Navigating to Payments & Subscriptions
Head over to Payments & Subscriptions. It’s usually flying under the radar, patiently waiting amongst other menu items.
Adding Credit or Debit Card Information
There it is! Add Payment Method. Punch in your credit or debit card details. Think Visa, MasterCard, whatever suits.
Feel that satisfaction? The digital gears turning, ready to bring you Android billing services.
Saving the Payment Method
Once you’ve entered everything, hit Save. There, your payment method is now part of your Google Play arsenal.
Alternative Payment Methods
PayPal
Who doesn’t love a bit of PayPal magic? Select PayPal as your payment method. Link that account and elevate your Google Play purchase game.
Google Play Gift Cards
Got a Google Play Gift Card lying around? Enter the code. And just like that, you’ve topped up your Google Play Credits. Hello, seamless purchases!
Google Play Credits
Speaking of credits, keep an eye on your Google Play Credits. Useful for those spontaneous buys and in-app goodies.
Adding Backup Payment Methods
Importance of Backup Payment Methods
Picture this: You’re knee-deep in your favorite game, about to make that crucial in-app purchase…and bam! Your primary payment method fails.
Nightmare, right? That’s where backup payment methods swoop in like a digital superhero.
They ensure your subscriptions keep rolling, your purchases don’t hit the brakes, and you stay in the flow. It’s like having a financial safety net.
Steps to Add Backup Payment Methods
Navigating to Subscriptions
Fire up your Google Play Store App on your Android device. Tap on that familiar hamburger icon to open the menu.
Scroll until you see Payments & Subscriptions—it’s like finding a hidden door to your financial stability.
Selecting Backup Payment Method Option
Once in Subscriptions, look for an option that lets you add a backup payment method. This isn’t buried deep; it’s there, waiting for someone savvy like you to activate it.
This choice is your gateway to ensuring those monthly charges don’t come to a sudden stop.
Following On-Screen Instructions
On-screen prompts will appear, guiding you through adding this backup method. It’s almost like the app is speaking your language, walking you step by step.
Whether it’s another credit card, a trusty PayPal account, or those Google Play Credits you’ve been hoarding, enter the details as prompted.
Pro Tip: Make sure your backup isn’t the same as your primary method. Diversity is key, like a well-prepared digital wallet.
Editing Existing Payment Methods
On Android Devices
Opening Google Play Store App
Grab your Android device, find the Google Play Store App, and tap it open. That familiar icon isn’t just a portal to apps and games—it’s your gateway to managing your Google Play billing.
Navigating to Payments & Subscriptions
Next, navigate to Payments & Subscriptions. Head straight for the hamburger menu (those three lines in the upper-left), where you’ll find your financial hub.
Editing Existing Payment Methods
Inside Payments & Subscriptions, you’ll see your existing payment methods. Time to edit. Tap on the method you want to change—be it a credit card or PayPal—and start tweaking the details. Maybe it’s an updated card number or a new expiration date.
Saving Changes
Once you’ve made your edits, save them. There’s usually a button at the bottom—hit it. Confirmation sparkles, and voilà, your method is updated. Transactions smooth as butter.
On a Computer or Web Browser
Accessing Google Play via Web Browser
Switch to a bigger screen. Fire up your web browser and head over to the Google Play site. It’s like Google Play, but more expansive—the digital equivalent of stretching your legs.
Navigating to Payments & Subscriptions
Sign into your Google account (make sure it matches the one on your device). Head over to Payments & Subscriptions. The same rules apply here: It’s your control panel for all things financial in the Google ecosystem.
Editing Payment Method Information
Locate the payment method you want to tweak. Click it. You’re now in the edit menu. Change what needs changing—whether it’s fixing a billing address or updating an expiration date.
Updating and Saving Changes
After you’re finished, click save. Your changes upload faster than your thoughts, ensuring future Google Play purchases are seamless.
Common Issues and Solutions
Expired Cards
Old card died? Happens. Replace expired card details with your current info. New digits, new life.
Incorrect Billing Address
Billing address not matching your records? Double-check and correct it. Missteps here can block transactions.
Low Card Balance
Low funds? Even the best cards fall short sometimes. Ensure you have enough balance to cover your upcoming subscriptions and app splurges.
Removing a Payment Method from Google Play
On Android Devices
Opening Google Play Store App
Imagine you’re scrolling through your home screen, and there it is—the Google Play Store App. Click that vibrant triangle as if opening a hidden door to a digital realm.
Navigating to Payment Methods
Once inside, slide your thumb to the hamburger menu—those three stacked lines waiting patiently in the upper-left corner.
From there, dive into Payment Methods. It’s like finding the treasure chest in the middle of a jungle.
Accessing More Payment Settings
Now, we’re getting into the nitty-gritty. Head straight to More Payment Settings.
Everything you need is under this hood, ready for tweaks and adjustments.
Removing the Desired Payment Method
Find the method you want to say goodbye to. It’s like breaking up with a digital friend.
Tap on it. Select Remove. It might ask you to confirm, like a cautious friend double-checking your choice.
On a Computer or Web Browser
Accessing Google Play via Web Browser
Now, switch gears and crack open your preferred web browser. Navigate to the Google Play website, feeling the vastness and scope of it all.
Navigating to Payments & Subscriptions
Sign in to your Google account—the same one tied to your Play Store adventures.
Head straight to Payments & Subscriptions. Think of it as your personal finance center in the Google empire.
Removing the Payment Method
Locate the payment method you’ve grown weary of. Click on it like opening a portal.
Select Remove. It’s time to part ways with grace and finality.
Confirming Removal
The last step is right there—Confirm Removal. Double-check, triple-check if you must. Once confirmed, that method vanishes, leaving your digital wallet a little lighter, a little simpler.
Changing Payment Methods During a Purchase
On Android Devices
Opening Google Play Store App
Alright, let’s say you’re mid-scroll on your Android device, and there it gleams—the Google Play Store App. Tap it. We’re diving into the digital bazaar.
Navigating to Paid Item’s Detail Page
You’ve got your heart set on an epic game or a must-have app. Navigate to the paid item’s detail page. It’s like eyeing that shiny gadget behind the glass counter—so close you can almost feel it.
Reviewing App Permissions
Before splurging, tap on App Permissions. Know what you’re handing over in exchange. A bit of due diligence. It’s like checking the ingredients before taking a bite.
Selecting Payment Methods
Scroll down. You’ll find the Payment Methods section. This is where the magic happens. Tap to reveal your current payment method. Ready for a change?
Hit the edit icon. If your default is a trusty credit card and you’re feeling adventurous about trying PayPal, now’s the moment.
Adding New Payment Methods if Necessary
No suitable method? Time to add new ones. Select Add Payment Method and embrace the options—credit card, debit card, or those elusive Google Play Credits. Just follow the on-screen wizard—let it guide you through entering and confirming the details.
Completing the Purchase
Now, with the preferred payment method selected, move to Complete Purchase. Click. That’s it. Unlock the app, install, and revel in the satisfaction of a seamless transaction. Whether it’s the latest game or a productivity booster, it’s yours.
Impact of Removing a Payment Method
Interconnected Google Services
You’d think removing a payment method is just about the Google Play Store, right? Think again.
Google Pay
First up, Google Pay. This isn’t just your wallet for apps and games. It’s the cornerstone of your digital financial life. Yank out a payment method here, and you’re pulling a thread that unravels through everything. Imagine trying to buy coffee with a card you’d removed in a frantic attempt to clean house. Not fun.
Chrome’s Saved Credit Cards
Next stop: Chrome’s Saved Credit Cards. This one’s a sleeper hit. Google’s like an octopus, tentacles everywhere. Remove a card from Google Play, and it’s disappearing from Chrome’s saved payment methods too. No more quick autofill when you’re snagging that online deal.
Ensuring Continuous Access to Subscriptions
Cautionary tale time. Removing a payment method can be like cutting the wrong wire in a bomb movie.
Checking Active Subscriptions
Before you hit delete, take a moment. Dive into Active Subscriptions. Netflix, Spotify, that obscure app you love—they’re all tethered to your payment methods. Check these. Know what’s at stake. See what’s riding on that card or account.
Avoiding Service Interruptions
Service interruptions—like a pothole on your smooth digital highway. Don’t just rip out a payment method without a backup plan. Switch payment methods first. Ensure continuity. Imagine a weekend without Netflix because your subscription lapsed. A horrifying thought, right?
Accepted Payment Methods on Google Play
| Payment Method | Description |
|---|---|
| Credit/Debit Cards | Google Play accepts major credit and debit cards like Visa, MasterCard, American Express, and Discover. |
| Google Pay | Google’s own payment service which links various cards and bank accounts. |
| PayPal | Available in many countries, PayPal can be linked to your Google Play account. |
| Mobile Carrier Billing | Allows you to charge purchases to your mobile phone bill. |
| Gift Cards | Google Play gift cards can be redeemed for purchases. |
| Google Play Balance | Includes promotional credits and redeemed gift cards that can be used for purchases. |
| Bank Account | Available in certain countries, it allows direct debits from your bank account. |
Credit and Debit Cards
Accepted Card Types (e.g., Visa, MasterCard)
Let’s talk plastic. Google Play is quite accommodating when it comes to credit and debit cards.
You’re looking at mainstream acceptance: Visa, MasterCard, American Express—the heavy hitters. These work seamlessly across apps, games, movies, and more.
Regional Differences in Accepted Cards
Here’s where it gets intriguing. What flies in one country might hit turbulence in another.
Regional Differences shape what cards are accepted. Think locally: where you are might change which cards you can use. Discover might be golden in the States but a no-go elsewhere. Always worth checking the local guidelines.
Other Payment Options
PayPal
Let’s inject some versatility. PayPal is your digital Swiss Army knife. Link it, love it.
It’s almost universally praised for offering a secure alternative to traditional cards. Just plug it into your Google account and sail through transactions effortlessly.
Google Play Gift Cards
These are like hidden treasure chests. Google Play Gift Cards open up a world of buying power without the card strings attached.
Whether it’s a gift from a friend or a treat to yourself, enter the gift code and watch your balance grow. Perfect for those who prefer to not tether purchases to their credit or debit cards.
Google Pay Balance
Ah, the Google Pay Balance. Think of it as your digital piggy bank within the Google ecosystem.
Load it up with funds and use it across any Google Play purchases. It’s particularly handy if you’re managing a budget and prefer to pre-load your spending money.
Carrier Billing Options in the U.S.
Let’s not forget the magic of Carrier Billing. Imagine buying that new app and seeing the charge on your phone bill. It’s almost too easy.
This is particularly popular in the U.S., where your carrier steps in to handle the transaction. Convenience at its finest, linking your spending directly with your mobile service provider.
FAQ On How To Add Or Remove Payment Methods In Google Play
How do I add a payment method to Google Play on my Android device?
To add a payment method, open the Google Play Store app. Tap the profile icon, navigate to Payments & Subscriptions, and select Add Payment Method.
You can then pick from credit cards, PayPal, or Google Play Gift Cards. Follow the on-screen steps to complete the setup.
Can I manage my Google Play payments from a web browser?
Yes, absolutely. Access Google Play via your web browser and sign in to your Google account. Navigate to Payments & Subscriptions, where you can add, remove, or update payment information.
This is especially useful for managing subscriptions and ensuring your payment details are up-to-date.
What alternative payment options are available on Google Play?
Google Play offers multiple payment options such as PayPal, Google Play Credits, and Google Play Gift Cards. You can also use carrier billing if it’s supported by your mobile provider, making it versatile for different user preferences.
How do I add a backup payment method?
Within the Google Play Store app, head to Subscriptions under Payments & Subscriptions. Select Add Backup Payment Method and follow the prompts.
A backup ensures uninterrupted services for your Google Play subscriptions, even if your primary method fails.
How do I remove a payment method on my Android device?
Open the Google Play Store app and go to Payments & Subscriptions. Choose Payment Methods, then tap More Payment Settings. Select the payment method you wish to delete and tap Remove. Confirm your choice to finalize the removal.
What should I do if my payment method gets declined?
If your payment method fails, check for common issues like an expired card, incorrect billing address, or low balance. Update your credit card information under Payments & Subscriptions in the Google Play Store app or through the web browser for quick resolutions.
How can I update my billing information on Google Play?
To update your billing info, navigate to Payments & Subscriptions in the Google Play Store app. Select the payment method you want to edit, update the necessary details, and save changes. You can also do this from any web browser by accessing your Google account.
Is it possible to use multiple payment methods?
Yes, you can add multiple payment methods in Google Play Store. This allows you to set a backup payment option. It’s ideal for managing subscriptions and ensuring continuous service, even if the primary method fails.
How do I change my payment method during a purchase?
When making a purchase, tap the item and go to the payment screen. Choose Payment Methods and select your preferred option. Here, you can also add a new payment method if necessary. Review app permissions and complete the transaction seamlessly.
What happens to my subscriptions if I remove a payment method?
When you remove a payment method, it’s crucial to check your active subscriptions to avoid service interruptions. Update your payment information or set up a backup to ensure continuous access. Remember, interconnected services like Google Pay and Chrome’s saved credit cards might be affected.
Conclusion
Mastering how to add or remove payment methods in Google Play is essential for maintaining seamless interactions within your digital ecosystem. Whether on your Android device or using a web browser, understanding these steps ensures uninterrupted access to apps, media, and subscriptions.
Key takeaways:
- Adding Payment Methods: Diverse options including credit cards, PayPal, and Google Play Gift Cards.
- Removing Methods: Ensure active subscriptions are checked to avoid service disruptions.
- Backup Payment Setup: A safeguard against payment failures, securing your Google Play activities.
- Editing Details: Quickly update expired cards, incorrect billing addresses, or low balances.
By effectively managing your Google Play payment options, you streamline purchases, enhance security with backup methods, and ensure continuous access to your favorite content and services. From handling subscriptions to troubleshooting payment issues, being proactive about your payment settings elevates your overall experience within the Google ecosystem. Navigate your financial interactions with confidence and keep your digital life running smoothly.
If you liked this article about how to add or remove payment methods in Google Play, you should check out this article about how to submit an app to the Google Play store for beta testing.
There are also similar articles discussing how to change the country in the Google Play store, How to get a refund from the Google Play Store, how to set Google Play parental control, and how to cancel a subscription on Google Play.
And let’s not forget about articles on Google Play stuck on pending, Google Play store not working, Google Play age ratings, and Google Play store ranking algorithm.

